注解驱动开发
面向 Spring 开发已经逐渐从繁琐的 XML 配置文件发展到简单好用的注解驱动模式,尤其是在 SpringBoot 这样一款快速开发脚手架中,底层大量使用注解完成各种各样的高级功能,因此非常有必要整理下 Spring/SpringBoot 提供的常用注解。为了便于记忆,将常用的注解分成以下几个部分:
组件注册
@Configuration + @Bean
环境搭建:创建一个 SpringBoot 项目(以下注解都基于该项目进行演示和测试),用于演示如何使用 @Configuration 和 @Bean 注解向 IoC 容器中注入组件。
先定义 Person 和 Pet 两个普通的 POJO 类;
javapublic class Person { private String name; private Integer age; private Pet pet; public Person() { } public Person(String name, Integer age, Pet pet) { this.name = name; this.age = age; this.pet = pet; } public String getName() { return name; } public void setName(String name) { this.name = name; } public Integer getAge() { return age; } public void setAge(Integer age) { this.age = age; } public Pet getPet() { return pet; } public void setPet(Pet pet) { this.pet = pet; } }javapublic class Pet { private String name; private Integer age; public Pet() { } public Pet(String name, Integer age) { this.name = name; this.age = age; } public String getName() { return name; } public void setName(String name) { this.name = name; } public Integer getAge() { return age; } public void setAge(Integer age) { this.age = age; } }再定义由 @Configuration 注解标注的 MainConfig 主配置类,在该类中存在两个由 @Bean 注解的方法,方法返回值的类型分别为 Person 和 Pet;
java@Configuration public class MainConfig { @Bean public Person person() { return new Person("xiaorang", 18, pet()); } @Bean public Pet pet() { return new Pet("xiaobai", 2); } }创建测试类 ApiTest
java@SpringBootTest public class ApiTest { @Test public void test_00(ApplicationContext applicationContext) { Person person = applicationContext.getBean(Person.class); Pet pet = applicationContext.getBean(Pet.class); System.out.println(person); System.out.println(person.getPet()); System.out.println(pet); } }该测试类上标注 @SpringBootTest 注解,该注解一般用于集成测试,默认会加载完整的 Spring 应用程序并注册所有的单实例 Bean;
- 在该测试类中可以通过自动装配(使用 @Autowired/@Resource/@Inject 注解)给属性赋值,使用方式与日常开发过程中的 Controller 依赖 Service 一致!
- 另外一种使用方式如上示例所示,将属性作为测试方法的参数,参数值将由 IoC 容器自动注入!有点类似于构造参数注入的方式
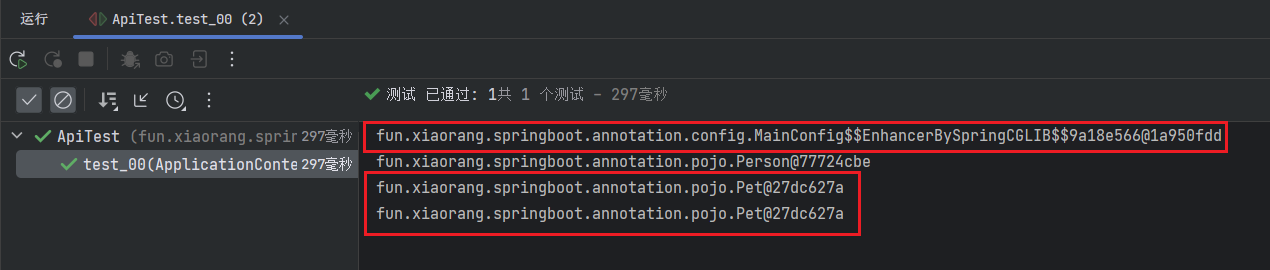
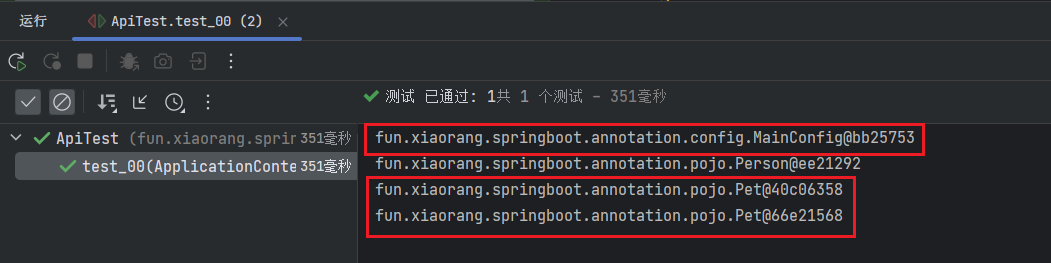
测试结果如下所示:
细节分析:
- 当使用 @Configuration 注解标注在某个类上时,表示该类是一个配置类,其作用是代替 XML 配置文件;其实 @Configuration 注解本质上任然是一个 @Component 注解,所以被 @Configuration 注解标注的类也会被注册到 IoC 容器中;
- 在配置类中的某个方法上标注 @Bean 注解表示会将该方法返回的实例对象注册到 IoC 容器中(通用的 factory-method 机制),其作用是代替 XML 配置文件中的 bean 标签;其中注册进 IoC 容器中的 Bean 的类型为方法的返回值,id 默认为方法名,不过可以通过注解中的 name 或者 value 属性修改;❗ 值得注意的是,被 @Bean 注解标注的方法中的参数会由 IoC 容器自动注入!
配置类的 FULL & LITE 模式
FULL 模式:是指配置类上标注的 @Configuration 注解中的 proxyBeanMethods 属性缺省(默认)或者显示设置为 true。在该模式下,
配置类本身会被 CGLIB 进行增强,注册到 IoC 容器中的 Bean 是其代理对象!如上述测试结果中的
fun.xiaorang.springboot.annotation.config.MainConfig$$EnhancerBySpringCGLIB$$4a661257@47a7c93e;不管是配置类外部还是内部多次调用被 @Bean 注解标注的方法,返回的都是 IoC 容器中的单例对象,保证获取到的是同一个对象;如上述测试结果中,Person 对象中的 pet 属性与从 IoC 容器中获取的 pet 对象相等,说明调用配置类中被 @Bean 注解标注的方法返回的对象是从 IoC 容器获取的,与 IoC 容器中的单实例 Bean 是同一个对象。走的是配置类代理对象的代理逻辑
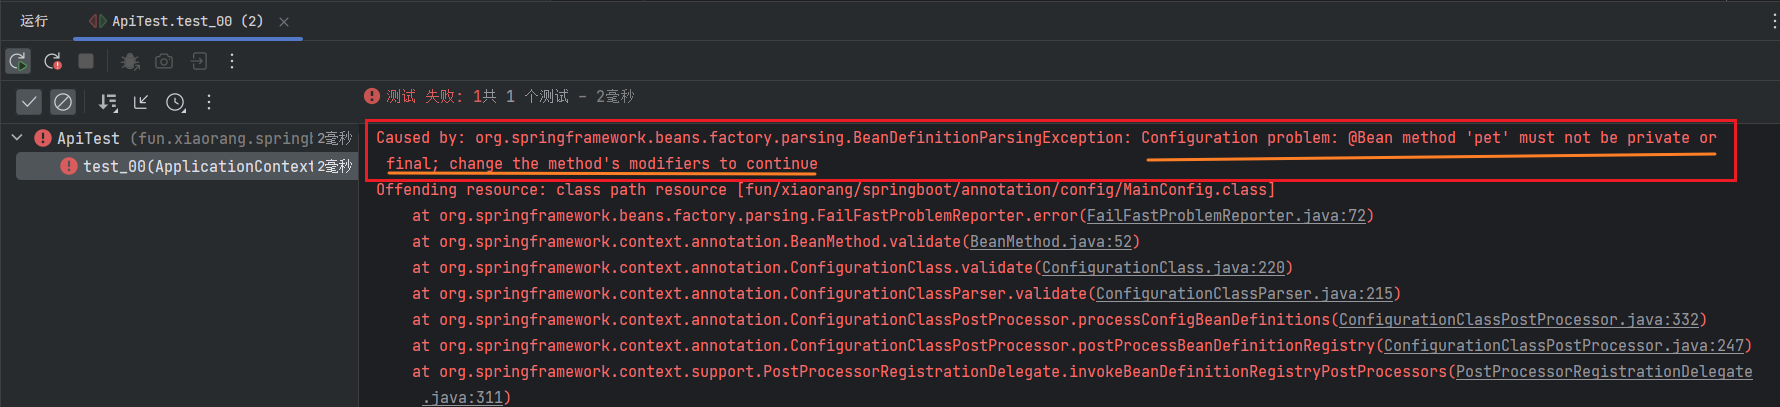
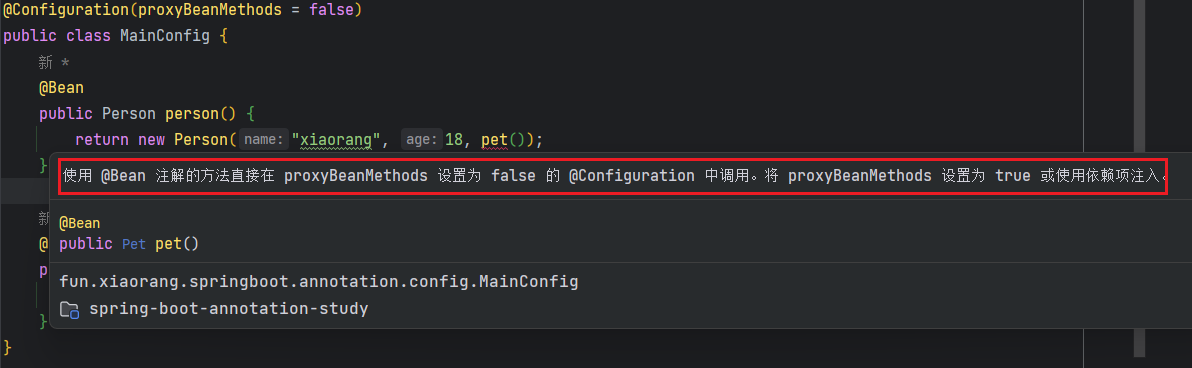
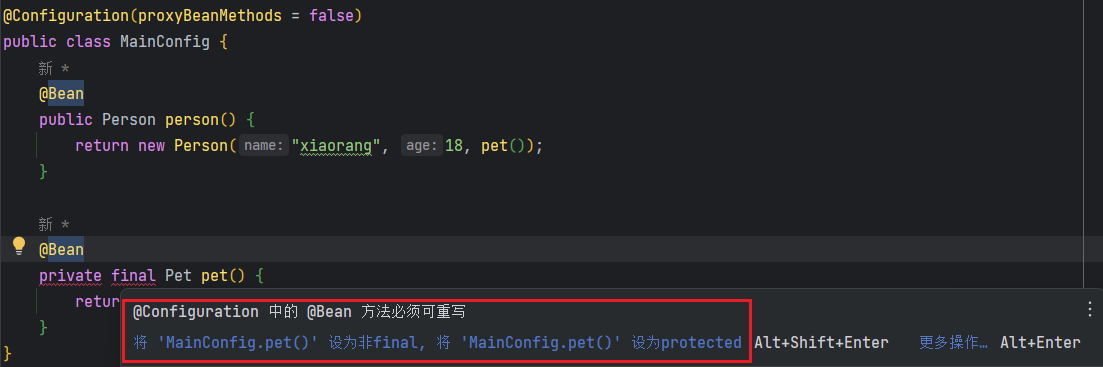
被 @Bean 注解标注的方法不能被 private 或者 final 修饰符进行修饰(因为由 CGLIB 动态代理生成的代理对象会继承自该类,被 private 或 final 修饰的方法无法进行重写),否则启动会报错(其实在编译阶段 IDEA 就已经给出提示,不允许这样使用)!
LITE 模式:由源码可知,存在以下几种情况,是指配置类 ⤵️
- 上标注的 @Configuration 注解中的 proxyBeanMethods 属性显示设置为 false;
- 被 @Component 或 @ComponentScan 或 @Import 或 @ImportResource 四个注解所标注;
- 中存在被 @Bean 注解标注的方法;
在该模式下,
配置类本身不会被 CGLIB 进行增强,注册到 IoC 容器中的 Bean 是其本身的实例对象;
不管是配置类外部还是内部多次调用被 @Bean 注解标注的方法,每次获取到的都是一个新的实例对象,并非 IoC 容器中的单实例 Bean;
被 @Bean 注解标注的方法虽然可以被 private 或者 final 修饰符进行修饰,程序运行时不会报错!但是在编译阶段,IDEA 并不推荐这样使用!
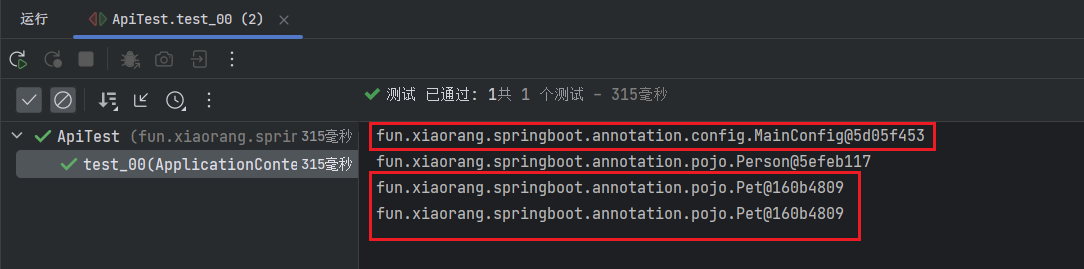
测试结果如下所示:
由上述结果可知,在 LITE 模式下,从 IoC 容器中获取到的 Bean 是配置类本身,而不是代理对象;
Person 对象中的 pet 属性与从 IoC 容器中获取的 pet 对象并不相等,说明不是同一个对象!如果想将 IoC 容器中的 pet 实例对象注入到 Person 对象中的 pet 属性,则不要通过调用方法的方式,而是通过方法参数的方式,前面已经提到过,被 @Bean 注解标注的方法中的参数会由 IoC 容器自动注入!这样获取到的就会是同一个对象。如下所示:
java@Bean public Person person(Pet pet) { return new Person("xiaorang", 18, pet); }再次测试,测试结果如下所示:Person 对象中的 pet 属性与从 IoC 容器中获取的 pet 对象相等,说明是同一个对象!
开发中间件、通用组件,建议使用 LITE 模式,提高运行性能,降低启动时间(因为不需要对配置类使用 CGLIB 进行动态代理),所以,可以看到 SpringBoot 大量 xxxAutoConfiguration 配置类中 @Configuration 注解的 proxyBeanMethods = false,即使用 LITE 模式。
@ComponentScan + @Component
在实际项目开发中,使用的更多的是包扫描对项目中的类进行扫描,默认会扫描指定包路径及其子包下所有标注 @Repository、@Service、@Controller 和 @Component 注解的类并注册到 IoC 容器中。
可以看到,在 SpringBoot 项目的启动类上标注了一个 @SpringbootApplication 复合注解,该注解由 @SpringBootConfiguration、@EnableAutoConfiguration 和 @ComponentScan 三个注解组成,目前关注的点是 @ComponentScan 注解,至于前两个注解后续会在 SpringBoot-自动配置原理剖析 中对其进行详细分析!
@SpringBootConfiguration
@EnableAutoConfiguration
@ComponentScan(
    excludeFilters = {@Filter(
    type = FilterType.CUSTOM,
    classes = {TypeExcludeFilter.class}
), @Filter(
    type = FilterType.CUSTOM,
    classes = {AutoConfigurationExcludeFilter.class}
)}
)
public @interface SpringBootApplication {
    ...
    @AliasFor(
        annotation = ComponentScan.class,
        attribute = "basePackages"
    )
    String[] scanBasePackages() default {};
    ...
}由 @SpringbootApplication 注解的定义可知,其 basePackages 属性对应的其实是 @ComponentScan 中的 basePackages 属性,当 basePackages 属性缺省时,则默认会扫描当前启动类所在包及其子包下所有标注 @Repository、@Service、@Controller 和 @Component 注解的类并注册到 IoC 容器中。至于 @ComponentScan 注解定义如下所示:
@Retention(RetentionPolicy.RUNTIME)
@Target(ElementType.TYPE)
@Documented
@Repeatable(ComponentScans.class)
public @interface ComponentScan {
    /**
		用于指定要扫描的包。
	 */
    @AliasFor("basePackages")
    String[] value() default {};

    /**
  	它和value作用是一样的。
	 */
    @AliasFor("value")
    String[] basePackages() default {};

    /**
	  	指定具体要扫描的类的字节码。
	 */
    Class<?>[] basePackageClasses() default {};

    /**
	  	指定扫描bean对象存入容器时的命名规则。
	 */
    Class<? extends BeanNameGenerator> nameGenerator() default BeanNameGenerator.class;

    Class<? extends ScopeMetadataResolver> scopeResolver() default AnnotationScopeMetadataResolver.class;

    ScopedProxyMode scopedProxy() default ScopedProxyMode.DEFAULT;

    String resourcePattern() default ClassPathScanningCandidateComponentProvider.DEFAULT_RESOURCE_PATTERN;

    /**
	  	是否使用默认的过滤规则,是的话则会扫描指定包以及子包下所有标注@Component、@Repository、@Service、@Controller 注解的类并将其注册到 IoC 容器中,默认为 true
	 */
    boolean useDefaultFilters() default true;

    /**
	  	自定义组件扫描的过滤规则,用以扫描组件。
			FilterType有5种类型:
	            ANNOTATION, 注解类型 默认
	            ASSIGNABLE_TYPE,指定固定类
	            ASPECTJ, ASPECTJ类型
	            REGEX,正则表达式
	            CUSTOM,自定义类型
	 */
    Filter[] includeFilters() default {};

    /**
	  	自定义组件扫描的排除规则。
	 */
    Filter[] excludeFilters() default {};

    /**
	  	组件扫描时是否采用懒加载 ,默认不开启。
	 */
    boolean lazyInit() default false;

    @Retention(RetentionPolicy.RUNTIME)
    @Target({})
    @interface Filter {
        FilterType type() default FilterType.ANNOTATION;

        @AliasFor("classes")
        Class<?>[] value() default {};

        @AliasFor("value")
        Class<?>[] classes() default {};

        String[] pattern() default {};
    }
}为了测试方便,将 @SpringbootApplication 复合注解拆分成 @SpringBootConfiguration、@EnableAutoConfiguration 和 @ComponentScan 三个注解标注在启动类上,如下所示:
@SpringBootConfiguration
@EnableAutoConfiguration
@ComponentScan(
        excludeFilters = {@ComponentScan.Filter(
                type = FilterType.CUSTOM,
                classes = {TypeExcludeFilter.class}
        ), @ComponentScan.Filter(
                type = FilterType.CUSTOM,
                classes = {AutoConfigurationExcludeFilter.class}
        )}
)
public class SpringBootAnnotationStudy {
    public static void main(String[] args) {
        SpringApplication.run(SpringBootAnnotationStudy.class, args);
    }
}前期准备,增加三个分别标注 @Controller、@Service、@Repository 注解的组件:
@Controller
public class BookController {

}@Service
public class BookService {
}@Repository
public class BookRepository {
}现在着重来分析下 @ComponentScan 注解中的 includeFilters 和 excludeFilters 两个属性。
includeFilters 属性用于指定进行包扫描时该按照什么过滤规则去注册(保留)组件;
举个栗子,在启动类上增加另一个 @ComponentScan 注解(该注解由 @Repeatable 注解标注,JDK1.8 出现,重复注解,被其标注的注解表示可以在类上标注多次),让其只扫描被 @Controller 注解标注的类和 BookService 类,理论上,这样做的话,BookRepository 类就不会被注册到 IoC 容器中。
java@SpringBootConfiguration @EnableAutoConfiguration @ComponentScan( excludeFilters = {@ComponentScan.Filter( type = FilterType.CUSTOM, classes = {TypeExcludeFilter.class} ), @ComponentScan.Filter( type = FilterType.CUSTOM, classes = {AutoConfigurationExcludeFilter.class} )} ) @ComponentScan(value = "fun.xiaorang.springboot.annotation", includeFilters = { @ComponentScan.Filter(type = ANNOTATION, classes = {Controller.class}), @ComponentScan.Filter(type = ASSIGNABLE_TYPE, classes = {BookService.class}) }) public class SpringBootAnnotationStudy { public static void main(String[] args) { SpringApplication.run(SpringBootAnnotationStudy.class, args); } }增加测试方法,如下所示:
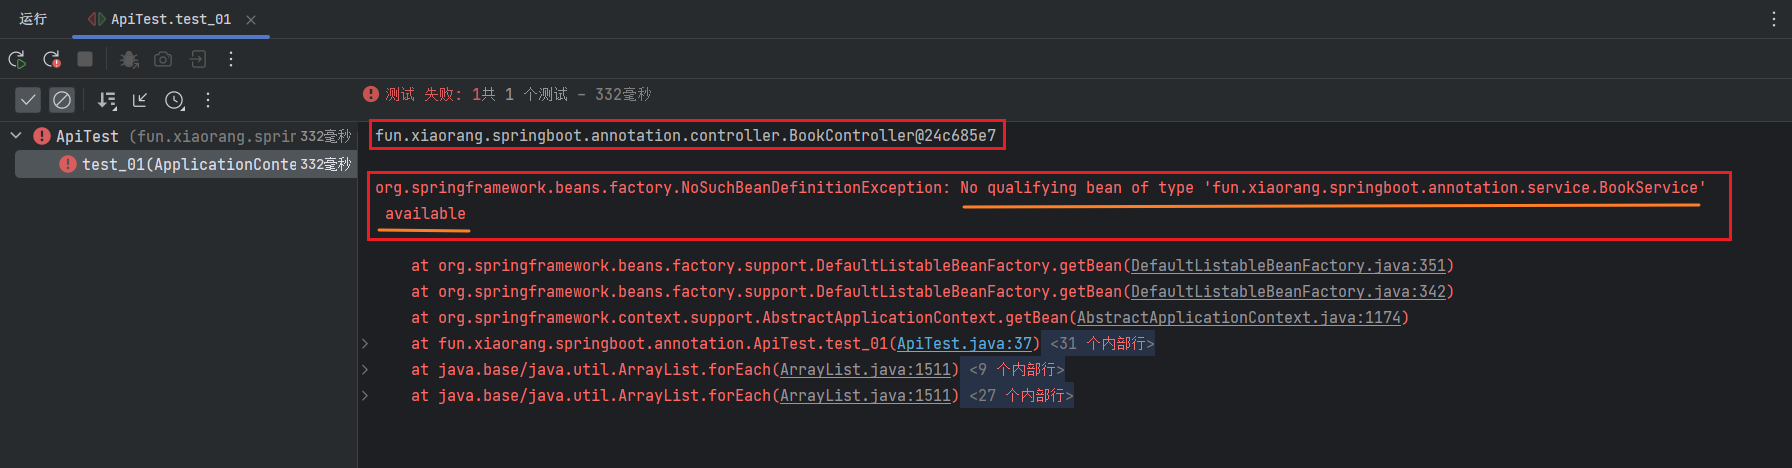
java@Test public void test_01(ApplicationContext applicationContext) { BookController bookController = applicationContext.getBean(BookController.class); System.out.println(bookController); BookService bookService = applicationContext.getBean(BookService.class); System.out.println(bookService); BookRepository bookRepository = applicationContext.getBean(BookRepository.class); System.out.println(bookRepository); }测试结果如下所示:
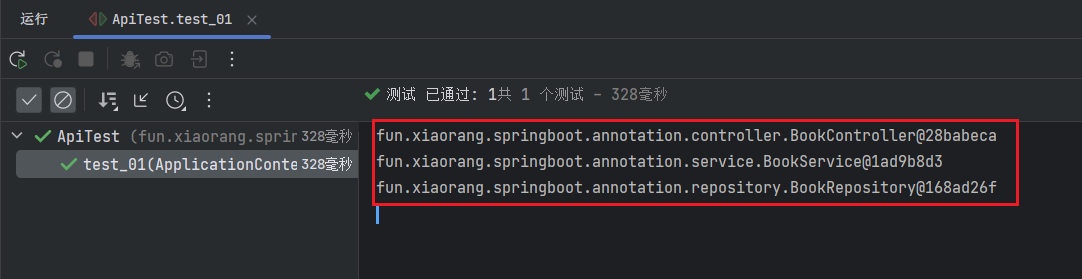
这不对啊!和猜想的不一致,这是怎么回事呢?其实,有一个重要的点还没有提到,由上面的定义可知,在 @ComponentScan 注解中有一个 useDefaultFilters 属性,默认为 true,表示使用默认的过滤规则(扫描指定包及其子包下所有标注@Component、@Repository、@Service、@Controller 注解的类并将其注册到 IoC 容器中),这样一来,BookRepository 类就被扫描注册到 IoC 容器中,要想排除干扰,就需要将启动类上标注的两个 @ComponentScan 注解中的 useDefaultFilters 属性显示设置为 false,如下所示:java@SpringBootConfiguration @EnableAutoConfiguration @ComponentScan( excludeFilters = {@ComponentScan.Filter( type = FilterType.CUSTOM, classes = {TypeExcludeFilter.class} ), @ComponentScan.Filter( type = FilterType.CUSTOM, classes = {AutoConfigurationExcludeFilter.class} )}, useDefaultFilters = false ) @ComponentScan(value = "fun.xiaorang.springboot.annotation", includeFilters = { @ComponentScan.Filter(type = ANNOTATION, classes = {Controller.class}), @ComponentScan.Filter(type = ASSIGNABLE_TYPE, classes = {BookService.class}) }, useDefaultFilters = false) public class SpringBootAnnotationStudy { public static void main(String[] args) { SpringApplication.run(SpringBootAnnotationStudy.class, args); } }再次测试,测试结果如下所示:
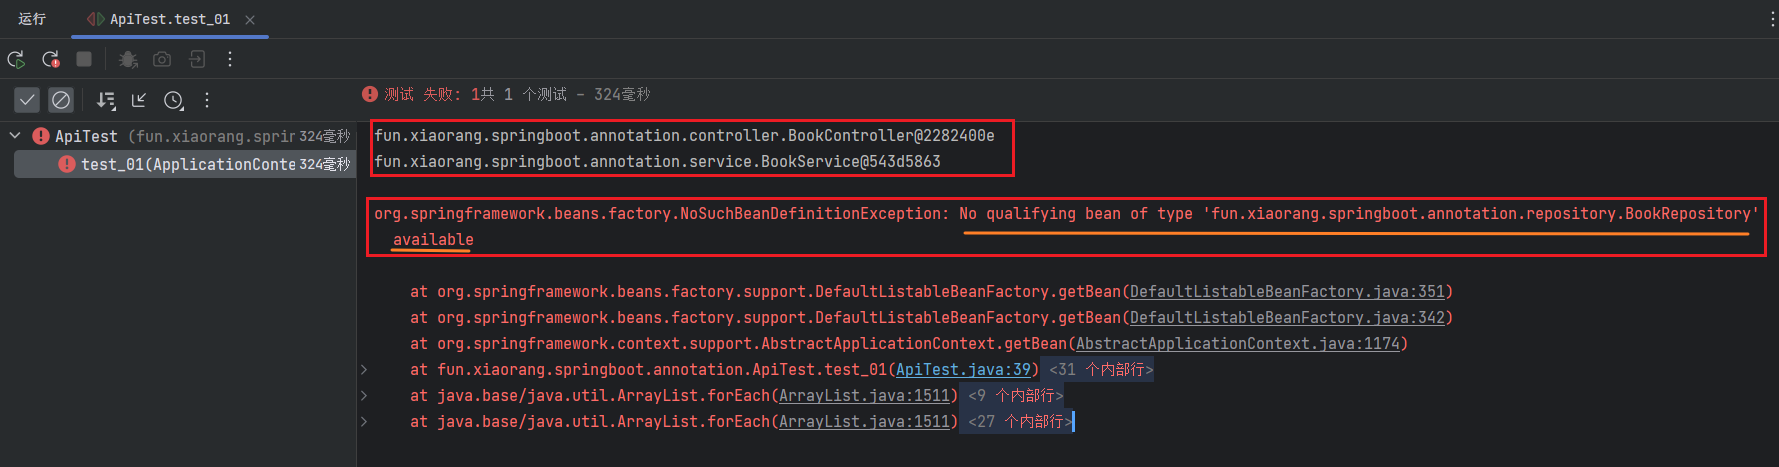
达到预期效果,IoC 容器中只存在 BookController 和 BookService 组件,BookRepository 组件并没有被扫描注册到 IoC 容器中,所以从 IoC 容器中获取的时候抛出如上异常!excludeFilters 属性用于指定进行包扫描时该按照什么过滤规则去排除组件;
举个栗子,在增加的 @ComponentScan 注解中配置 excludeFilters 属性,让其不扫描被 @Service 注解标注的类,理论上,这样做的话,IoC 容器中只剩下 BookController 组件,BookService 组件就被排除掉了。
java@SpringBootConfiguration @EnableAutoConfiguration @ComponentScan( excludeFilters = {@ComponentScan.Filter( type = FilterType.CUSTOM, classes = {TypeExcludeFilter.class} ), @ComponentScan.Filter( type = FilterType.CUSTOM, classes = {AutoConfigurationExcludeFilter.class} )}, useDefaultFilters = false ) @ComponentScan(value = "fun.xiaorang.springboot.annotation", includeFilters = { @ComponentScan.Filter(type = ANNOTATION, classes = {Controller.class}), @ComponentScan.Filter(type = ASSIGNABLE_TYPE, classes = {BookService.class}) }, excludeFilters = { @ComponentScan.Filter(type = ANNOTATION, classes = Service.class) }, useDefaultFilters = false) public class SpringBootAnnotationStudy { public static void main(String[] args) { SpringApplication.run(SpringBootAnnotationStudy.class, args); } }再次测试,测试结果如下所示:
达到预期效果,IoC 容器中只存在 BookController 组件,BookService 组件被排除在外,所以从 IoC 容器中获取的时候抛出如上异常!
从 @ComponentScan 注解中的 @Filter 注解定义可知,组件扫描的过滤规则有 5 种,位于 FilterType 枚举类中
- ANNOTATION,注解类型 默认
- ASSIGNABLE_TYPE,指定固定类
- ASPECTJ,ASPECTJ 表达式
- REGEX,正则表达式
- CUSTOM,自定义类型
前面四种过滤规则都实现了 TypeFilter 接口,并且都有默认的实现类。如果想要自定义过滤规则的话,依葫芦画瓢,同样需要实现 TypeFilter 接口。
📝 需求:扫描所有标注自定义注解 @MyComponent 的类并将其注册到 IoC 容器中。实现步骤如下:
自定义注解
java@Target(ElementType.TYPE) @Retention(RetentionPolicy.RUNTIME) @Documented public @interface MyComponent { }自定义过滤规则
javapublic class MyTypeFilter implements TypeFilter { @Override public boolean match(MetadataReader metadataReader, MetadataReaderFactory metadataReaderFactory) { AnnotationMetadata metadata = metadataReader.getAnnotationMetadata(); return metadata.hasAnnotation(MyComponent.class.getName()); } }增加被自定义注解标注的类
java@MyComponent public class Man { }启动类上新标注的 @ComponentScan 注解中的 includeFilters 属性增加配置
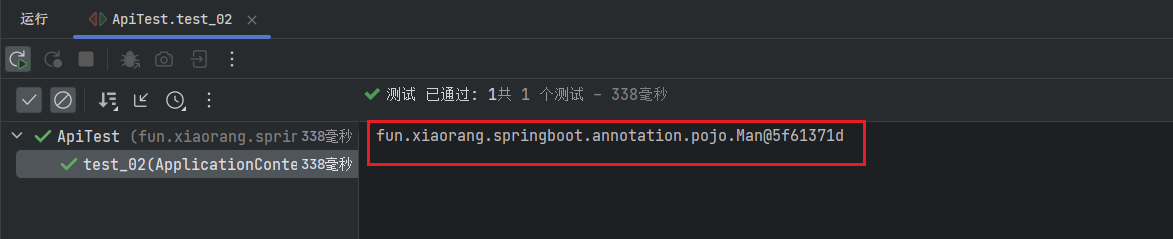
java@SpringBootConfiguration @EnableAutoConfiguration @ComponentScan( excludeFilters = {@ComponentScan.Filter( type = FilterType.CUSTOM, classes = {TypeExcludeFilter.class} ), @ComponentScan.Filter( type = FilterType.CUSTOM, classes = {AutoConfigurationExcludeFilter.class} )}, useDefaultFilters = false ) @ComponentScan(value = "fun.xiaorang.springboot.annotation", includeFilters = { @ComponentScan.Filter(type = ANNOTATION, classes = {Controller.class}), @ComponentScan.Filter(type = ASSIGNABLE_TYPE, classes = {BookService.class}), @ComponentScan.Filter(type = CUSTOM, classes = {MyTypeFilter.class}) }, excludeFilters = { @ComponentScan.Filter(type = ANNOTATION, classes = Service.class) }, useDefaultFilters = false) public class SpringBootAnnotationStudy { public static void main(String[] args) { SpringApplication.run(SpringBootAnnotationStudy.class, args); } }增加测试方法,如下所示:
java@Test public void test_02(ApplicationContext applicationContext) { Man man = applicationContext.getBean(Man.class); System.out.println(man); }测试结果如下所示:
@Import
前面已经介绍过可以使用 @ComponentScan + @Component 这种方式向 IoC 容器中注册组件,不过这这种方式有局限性,只能扫描本项目中的类并注册到 IoC 容器中,至于第三方 jar 包中的类该如何进行注册到 IoC 容器中呢?可以使用 @Configuration + @Bean 解决,不过现在介绍另一种方案:使用 @Import 注解快速向 IoC 容器中导入一个组件。其定义如下所示:
@Target(ElementType.TYPE)
@Retention(RetentionPolicy.RUNTIME)
@Documented
public @interface Import {

	/**
	 * {@link Configuration @Configuration}, {@link ImportSelector},
	 * {@link ImportBeanDefinitionRegistrar}, or regular component classes to import.
	 */
	Class<?>[] value();

}由 @Import 注解的定义可知,
@Import 注解只能作用在类上,通常配合配置类(被 @Configuration 注解标注的类)一起使用;
其 value 属性可以使用被 @Configuration 标注的配置类,实现 ImportSelector 或 ImportBeanDefinitionRegistrar 接口的类,一个简单的类;
(向 IoC 容器中导入)一个简单的类
简单的类
javapublic class Color { }配置类 MainConfig 上标注 @Import 注解,用于向 IoC 容器中快速导入 Color 组件
java@Configuration(proxyBeanMethods = false) @Import({Color.class}) public class MainConfig { @Bean public Person person(Pet pet) { return new Person("xiaorang", 18, pet); } @Bean public Pet pet() { return new Pet("xiaobai", 2); } }启动类上标注新的 @ComponentScan 注解,用于扫描 MainConfig 配置类
java@SpringBootConfiguration @EnableAutoConfiguration @ComponentScan(useDefaultFilters = false, includeFilters = { @ComponentScan.Filter(type = ASSIGNABLE_TYPE, classes = {MainConfig.class}) }) @ComponentScan( excludeFilters = {@ComponentScan.Filter( type = FilterType.CUSTOM, classes = {TypeExcludeFilter.class} ), @ComponentScan.Filter( type = FilterType.CUSTOM, classes = {AutoConfigurationExcludeFilter.class} )}, useDefaultFilters = false ) @ComponentScan(value = "fun.xiaorang.springboot.annotation", includeFilters = { @ComponentScan.Filter(type = ANNOTATION, classes = {Controller.class}), @ComponentScan.Filter(type = ASSIGNABLE_TYPE, classes = {BookService.class}), @ComponentScan.Filter(type = CUSTOM, classes = {MyTypeFilter.class}) }, excludeFilters = { @ComponentScan.Filter(type = ANNOTATION, classes = Service.class) }, useDefaultFilters = false) public class SpringBootAnnotationStudy { public static void main(String[] args) { SpringApplication.run(SpringBootAnnotationStudy.class, args); } }增加测试方法,如下所示:
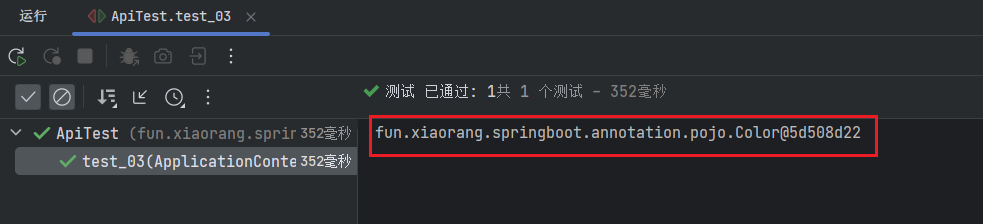
java@Test public void test_03(ApplicationContext applicationContext) { Color color = applicationContext.getBean(Color.class); System.out.println(color); }测试结果如下所示:发现可以从 IoC 容器中获取到 Color 组件。
(向 IoC 容器中导入)实现 ImportSelector 接口的类,关于 ImportSelector 接口的定义如下所示:
javapublic interface ImportSelector { /** * Select and return the names of which class(es) should be imported based on * the {@link AnnotationMetadata} of the importing @{@link Configuration} class. * @return the class names, or an empty array if none */ String[] selectImports(AnnotationMetadata importingClassMetadata); /** * Return a predicate for excluding classes from the import candidates, to be * transitively applied to all classes found through this selector's imports. * <p>If this predicate returns {@code true} for a given fully-qualified * class name, said class will not be considered as an imported configuration * class, bypassing class file loading as well as metadata introspection. * @return the filter predicate for fully-qualified candidate class names * of transitively imported configuration classes, or {@code null} if none * @since 5.2.4 */ @Nullable default Predicate<String> getExclusionFilter() { return null; } }该接口主要配合 @Import 注解一起使用,作用是收集需要导入的类,其中的 selectImports() 方法的返回值就是需要向 IoC 容器中导入的类的完全限定名。如果该接口的实现类同时实现 EnvironmentAware、BeanFactoryAware、BeanClassLoaderAware 和 ResourceLoaderAware 等接口,那么在调用其 selectImports() 方法之前会先调用上述接口中对应的方法,如果需要在所有的 @Configuration 配置类处理完再进行导入,那么可以实现其子类 DeferredImportSelector 接口。
在 selectImports() 方法中,存在一个 AnnotationMetadata 类型的参数,这个参数能够获取到与该接口一起配合使用的 @Import 注解中的属性信息。
📝 需求:使用 @Import 注解配合 ImportSelector 接口的方式向 IoC 容器中导入 Yellow 和 Blue 两个组件。实现步骤如下:Yellow 和 Blue 两个类
javapublic class Yellow { }javapublic class Blue { }自定义的 ImportSelector 接口实现类
javapublic class MyImportSelector implements ImportSelector { @Override public String[] selectImports(AnnotationMetadata importingClassMetadata) { return new String[]{"fun.xiaorang.springboot.annotation.pojo.Yellow", "fun.xiaorang.springboot.annotation.pojo.Blue"}; } }配置类 MainConfig 上标注的 @Import 注解中增加自定义的 ImportSelector 接口实现类
java@Configuration(proxyBeanMethods = false) @Import({Color.class, MyImportSelector.class}) public class MainConfig { @Bean public Person person(Pet pet) { return new Person("xiaorang", 18, pet); } @Bean public Pet pet() { return new Pet("xiaobai", 2); } }增加测试代码片段,如下所示:
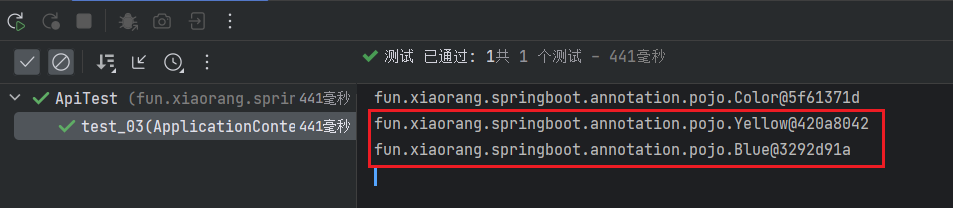
java@Test public void test_03(ApplicationContext applicationContext) { Color color = applicationContext.getBean(Color.class); System.out.println(color); Yellow yellow = applicationContext.getBean(Yellow.class); System.out.println(yellow); Blue blue = applicationContext.getBean(Blue.class); System.out.println(blue); }测试结果如下所示:发现可以从 IoC 容器中获取到 Yellow 和 Blue 组件。
(向 IoC 容器中导入)实现 ImportBeanDefinitionRegistrar 接口的类,关于 ImportBeanDefinitionRegistrar 接口的定义如下所示:
javapublic interface ImportBeanDefinitionRegistrar { /** * Register bean definitions as necessary based on the given annotation metadata of * the importing {@code @Configuration} class. * <p>Note that {@link BeanDefinitionRegistryPostProcessor} types may <em>not</em> be * registered here, due to lifecycle constraints related to {@code @Configuration} * class processing. * <p>The default implementation delegates to * {@link #registerBeanDefinitions(AnnotationMetadata, BeanDefinitionRegistry)}. * @param importingClassMetadata annotation metadata of the importing class * @param registry current bean definition registry * @param importBeanNameGenerator the bean name generator strategy for imported beans: * {@link ConfigurationClassPostProcessor#IMPORT_BEAN_NAME_GENERATOR} by default, or a * user-provided one if {@link ConfigurationClassPostProcessor#setBeanNameGenerator} * has been set. In the latter case, the passed-in strategy will be the same used for * component scanning in the containing application context (otherwise, the default * component-scan naming strategy is {@link AnnotationBeanNameGenerator#INSTANCE}). * @since 5.2 * @see ConfigurationClassPostProcessor#IMPORT_BEAN_NAME_GENERATOR * @see ConfigurationClassPostProcessor#setBeanNameGenerator */ default void registerBeanDefinitions(AnnotationMetadata importingClassMetadata, BeanDefinitionRegistry registry, BeanNameGenerator importBeanNameGenerator) { registerBeanDefinitions(importingClassMetadata, registry); } /** * Register bean definitions as necessary based on the given annotation metadata of * the importing {@code @Configuration} class. * <p>Note that {@link BeanDefinitionRegistryPostProcessor} types may <em>not</em> be * registered here, due to lifecycle constraints related to {@code @Configuration} * class processing. * <p>The default implementation is empty. * @param importingClassMetadata annotation metadata of the importing class * @param registry current bean definition registry */ default void registerBeanDefinitions(AnnotationMetadata importingClassMetadata, BeanDefinitionRegistry registry) { } }该接口主要配合 @Import 注解一起使用,通过接口中定义的 registerBeanDefinitions() 方法向 IoC 容器中注册组件的定义信息(BeanDefinition),Spring 后续会根据组件的定义信息创建出对应的组件注册到 IoC 容器中,这样看上去作用好像与 ImportSelector 接口差不多。
在 registerBeanDefinitions() 方法中,同样存在一个 AnnotationMetadata 类型的参数,这个参数能够获取到与该接口一起配合使用的 @Import 注解中的属性信息,最典型的栗子就是用于开启事务的 @EnableAspectJAutoProxy 注解。
📝 需求:使用 @Import 注解配合 ImportBeanDefinitionRegistrar 接口的方式向 IoC 容器中导入 Rainbow 组件。实现步骤如下:Rainbow 类
javapublic class Rainbow { }自定义的 ImportBeanDefinitionRegistrar 接口实现类
javapublic class MyImportBeanDefinitionRegistrar implements ImportBeanDefinitionRegistrar { @Override public void registerBeanDefinitions(AnnotationMetadata importingClassMetadata, BeanDefinitionRegistry registry) { BeanDefinition beanDefinition = new GenericBeanDefinition(); beanDefinition.setBeanClassName(Rainbow.class.getName()); registry.registerBeanDefinition("rainbow", beanDefinition); } }配置类 MainConfig 上标注的 @Import 注解中增加自定义的 ImportBeanDefinitionRegistrar 接口实现类
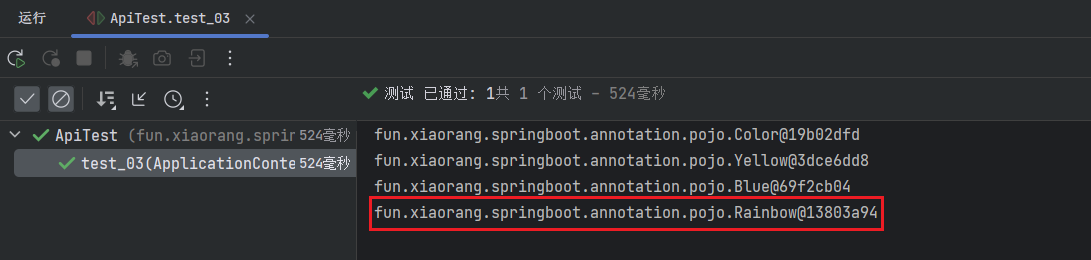
java@Configuration(proxyBeanMethods = false) @Import({Color.class, MyImportSelector.class, MyImportBeanDefinitionRegistrar.class}) public class MainConfig { @Bean public Person person(Pet pet) { return new Person("xiaorang", 18, pet); } @Bean public Pet pet() { return new Pet("xiaobai", 2); } }增加测试代码片段,如下所示:
java@Test public void test_03(ApplicationContext applicationContext) { Color color = applicationContext.getBean(Color.class); System.out.println(color); Yellow yellow = applicationContext.getBean(Yellow.class); System.out.println(yellow); Blue blue = applicationContext.getBean(Blue.class); System.out.println(blue); Rainbow rainbow = applicationContext.getBean(Rainbow.class); System.out.println(rainbow); }测试结果如下所示:发现可以从 IoC 容器中获取到 Rainbow 组件。
生命周期
一个 Bean 的生命周期主要分为四个阶段:实例化、属性填充(依赖注入)、初始化、销毁阶段。详细内容可以参考 Spring-Bean 的生命周期 文章!
此处主要涉及到 @PostConstruct + @PreDestroy 两个注解,分别作用于 Bean 的初始化和销毁阶段。
- @PostConstruct 注解主要用于自定义初始化方法作用于 Bean 的初始化阶段,存在以下几种等价的自定义初始化方法的方式:
- 实现 InitializingBean 接口,重写该接口定义的 afterPropertiesSet() 方法;
- 指定 @Bean 注解中的 initMethod 属性;与 XML 配置文件中 bean 标签的 init-method 属性类似
- @PreDestroy 注解主要用于自定义销毁方法作用与 Bean 的销毁阶段,存在以下几种等价的自定义销毁方法的方式:
- 实现 DisposableBean 接口,重写该接口定义的 destroy() 方法;
- 指定 @Bean 注解中的 destroyMethod 属性;与 XML 配置文件中 bean 标签的 destroy-method 属性类似
📝 需求:使用 @Configuration + @Bean 注解的方式向 IoC 容器中注册 Cat 组件,并使用以上提到的几种方式配置自定义初始化方法和销毁方法。实现步骤如下:
Cat 类,
- 创建分别被 @PostConstruct 和 @PreDestroy 注解标注的 postConstruct() 和 destroy() 方法;
- 实现 InitializingBean 和 DisposableBean 接口,重写这两个接口中定义的 afterPropertiesSet() 和 destroy() 方法;
- 创建 initMethod() 和 destroyMethod() 方法,分别用于配置 @Bean 注解中的 init-method 和 destroy-method 属性;
java@Slf4j public class Cat implements InitializingBean, DisposableBean { @PostConstruct public void postConstruct() { log.info("postConstruct()"); } @Override public void afterPropertiesSet() { log.info("InitializingBean#afterPropertiesSet()"); } public void initMethod() { log.info("initMethod()"); } @PreDestroy public void preDestroy() { log.info("preDestroy()"); } @Override public void destroy() { log.info("DisposableBean#destroy()"); } public void destroyMethod() { log.info("destroyMethod()"); } }配置类 MainConfig 中增加被 @Bean 注解标注的新方法,指定 @Bean 注解中的 initMethod 和 destroyMethod 属性
java@Configuration(proxyBeanMethods = false) @Import({Color.class, MyImportSelector.class, MyImportBeanDefinitionRegistrar.class}) public class MainConfig { @Bean public Person person(Pet pet) { return new Person("xiaorang", 18, pet); } @Bean public Pet pet() { return new Pet("xiaobai", 2); } @Bean(initMethod = "initMethod", destroyMethod = "destroyMethod") public Cat cat() { return new Cat(); } }增加测试方法,如下所示:
java@Test public void test_04(ApplicationContext applicationContext) { Cat cat = applicationContext.getBean(Cat.class); System.out.println(cat); }测试结果如下所示:

属性赋值
在使用 XML 配置文件的方式注册 bean 时,可以通过 bean 标签中的 property 子标签给 bean 中的属性进行赋值,如下所示:
<?xml version="1.0" encoding="UTF-8"?>
<beans xmlns:xsi="http://www.w3.org/2001/XMLSchema-instance"
  xmlns="http://www.springframework.org/schema/beans"
  xsi:schemaLocation="http://www.springframework.org/schema/beans http://www.springframework.org/schema/beans/spring-beans.xsd">
  <bean id="person" class="fun.xiaorang.springboot.annotation.pojo.Person">
    <property name="name" value="xiaorang"/>
    <property name="age" value="18"/>
    <property name="pet" ref="pet"/>
  </bean>

  <bean id="pet" class="fun.xiaorang.springboot.annotation.pojo.Pet">
    <property name="name" value="xiaobai"/>
    <property name="age" value="2"/>
  </bean>
</beans>其中,property 标签中的 name 属性为 bean 中字段的名称,value 属性为要赋给 bean 中对应字段的值。 那么如何使用注解的方式给 bean 中的属性赋值呢?此时,就需要用到 @Value 注解,其定义如下所示:
@Target({ElementType.FIELD, ElementType.METHOD, ElementType.PARAMETER, ElementType.ANNOTATION_TYPE})
@Retention(RetentionPolicy.RUNTIME)
@Documented
public @interface Value {

    /**
	 * The actual value expression such as <code>#{systemProperties.myProp}</code>
	 * or property placeholder such as <code>${my.app.myProp}</code>.
	 */
    String value();

}由 @Value 注解的定义可知,
- 可以标注在字段、方法、参数以及注解上,并且在程序运行期间生效;
- 该注解的主要作用是完成对属性的赋值,支持八种基本类型,String,SpEL 表达式
#{}以及属性占位符${}(通过读取配置文件中对应的 KEY 获取与之对应的 VALUE 值,配置文件支持 properties,yml 和 xml 文件);关于 SpEL 表达式的高级用法可以参考官方文档 SpEL 表达式
📝 需求:使用 @Configuration + @Bean 注解的方式向 IoC 容器中注册 Teacher 组件,并使用 @Value 注解给组件中的属性赋值。实现步骤如下:
Teacher 类
javapublic class Teacher { /** * String类型 */ @Value("小让") private String name; @Value("2023-05-17 00:10:05") private Date birthday; /** * SpEL表达式 */ @Value("#{30-3}") private int age; @Value("#{T(Math).random()}") private double salary; /** * 从环境变量(Environment)中取值 */ @Value("${teacher.workDate}") private String workDate; /** * 从环境变量中取值,如果没有该配置,则给一个默认值 */ @Value("${teacher.teach:english}") private String teach; @Override public String toString() { return "Teacher{" + "name='" + name + '\'' + ", birthday=" + birthday + ", age=" + age + ", salary=" + salary + ", workDate='" + workDate + '\'' + ", teach='" + teach + '\'' + '}'; } }配置类 MainConfig 中增加被 @Bean 注解标注的新方法,方法返回值为 Teacher 类型
java@Configuration(proxyBeanMethods = false) @Import({Color.class, MyImportSelector.class, MyImportBeanDefinitionRegistrar.class}) public class MainConfig { @Bean public Person person(Pet pet) { return new Person("xiaorang", 18, pet); } @Bean public Pet pet() { return new Pet("xiaobai", 2); } @Bean(initMethod = "initMethod", destroyMethod = "destroyMethod") public Cat cat() { return new Cat(); } @Bean public Teacher teacher() { return new Teacher(); } }增加测试方法,如下所示:
java@Test public void test_05(ApplicationContext applicationContext) { Teacher teacher = applicationContext.getBean(Teacher.class); System.out.println(teacher); }测试结果如下所示:

发现抛出如上异常信息,无法将格式为 "yyyy-MM-dd" 的日期类型字符串转换成 Date 类型,那么该如何解决呢?将日期格式更换为 "yyyy/MM/dd"
增加自定义类型转换器,可以参考 Spring-IOC 篇 文章或者以下官方文档内容 Core Technologies - Using @Value
Built-in converter support provided by Spring allows simple type conversion (to Integer or int for example) to be automatically handled. Multiple comma-separated values can be automatically converted to String array without extra effort. A Spring BeanPostProcessor uses a ConversionService behind the scenes to handle the process for converting the String value in @Value to the target type. If you want to provide conversion support for your own custom type, you can provide your own ConversionService bean instance as the following example shows:
java@Configuration public class AppConfig { @Bean public ConversionService conversionService() { DefaultFormattingConversionService conversionService = new DefaultFormattingConversionService(); conversionService.addConverter(new MyCustomConverter()); return conversionService; } }
咱们使用第二种解决方案:增加自定义类型转换器,实现步骤如下所示:
自定义类型转换器
javapublic class MyDateConverter implements Converter<String, Date> { private String pattern = "yyyy/MM/dd HH:mm:ss"; public MyDateConverter() { } public MyDateConverter(String pattern) { this.pattern = pattern; } @Override public Date convert(String source) { try { SimpleDateFormat sdf = new SimpleDateFormat(pattern); return sdf.parse(source); } catch (ParseException e) { e.printStackTrace(); } return null; } }使用 @Configuration + @Bean 注解的方式向 IoC 容器中注册 ConversionService 组件,组件的名称必须为 conversionService,否则的话不会生效!
java@Configuration(proxyBeanMethods = false) @Import({Color.class, MyImportSelector.class, MyImportBeanDefinitionRegistrar.class}) public class MainConfig { @Bean public Person person(Pet pet) { return new Person("xiaorang", 18, pet); } @Bean public Pet pet() { return new Pet("xiaobai", 2); } @Bean(initMethod = "initMethod", destroyMethod = "destroyMethod") public Cat cat() { return new Cat(); } @Bean public Teacher teacher() { return new Teacher(); } @Bean public ConversionService conversionService() { DefaultFormattingConversionService conversionService = new DefaultFormattingConversionService(); conversionService.addConverter(new MyDateConverter("yyyy-MM-dd HH:mm:ss")); // 如果添加同种 String -> Date 的类型转换器,后面添加的会生效 // conversionService.addConverter(new MyDateConverter()); return conversionService; } }
再次测试,测试结果如下所示:

发现抛出如上异常信息,无法解析 ${teacher.workDate} 中的占位符信息,那么此时该如何解决该异常呢?其实非常简单,在 resources 资源目录下增加 application.yml 配置文件即可,配置文件中的内容如下所示:yamlteacher: workDate: 2022-05-17 01:51:10再次测试,测试结果如下所示:

自动装配
在 XML 配置文件中给一个 bean 中的属性注入另一个 bean 时,需要用到 property 标签中的 ref 属性。如下所示:
<?xml version="1.0" encoding="UTF-8"?>
<beans xmlns:xsi="http://www.w3.org/2001/XMLSchema-instance"
  xmlns="http://www.springframework.org/schema/beans"
  xsi:schemaLocation="http://www.springframework.org/schema/beans http://www.springframework.org/schema/beans/spring-beans.xsd">
  <bean id="person" class="fun.xiaorang.springboot.annotation.pojo.Person">
    <property name="name" value="xiaorang"/>
    <property name="age" value="18"/>
    <property name="pet" ref="pet"/>
  </bean>

  <bean id="pet" class="fun.xiaorang.springboot.annotation.pojo.Pet">
    <property name="name" value="xiaobai"/>
    <property name="age" value="2"/>
  </bean>
</beans>那么该如何使用注解的方式完成属性填充/依赖注入呢?此时,就需要用到以下几个注解:
@Autowired
Core Technologies - Using @Autowired
@Target({ElementType.CONSTRUCTOR, ElementType.METHOD, ElementType.PARAMETER, ElementType.FIELD, ElementType.ANNOTATION_TYPE})
@Retention(RetentionPolicy.RUNTIME)
@Documented
public @interface Autowired {

    /**
	 * Declares whether the annotated dependency is required.
	 * <p>Defaults to {@code true}.
	 */
    boolean required() default true;

}由 @Autowired 注解的定义可知,该注解可以标注在构造方法、方法、参数、字段以及注解上。
📝 需求:使用 @ComponentScan + @Component 注解的方式向 IoC 容器中注册 OrderController 和 OrderService 组件,并使用 @Autowired 注解完成组件中属性的依赖注入。实现步骤如下:
OrderController 和 OrderService 接口及其实现类 OrderServiceImpl1
javapublic interface OrderService { }java@Service public class OrderServiceImpl1 implements OrderService { }java@Controller public class OrderController { // 提示不建议使用字段注入 // @Autowired private OrderService orderService; public OrderService getOrderService() { return orderService; } @Autowired public void setOrderService(OrderService orderService) { this.orderService = orderService; } @Override public String toString() { return "OrderController{" + "orderService=" + orderService + '}'; } }在配置类 MainConfig 上增加 @ComponentScan 注解用于扫描 OrderController 和 OrderService 组件
java@Configuration(proxyBeanMethods = false) @Import({Color.class, MyImportSelector.class, MyImportBeanDefinitionRegistrar.class}) @ComponentScan(value = "fun.xiaorang.springboot.annotation", includeFilters = { @ComponentScan.Filter(type = ASSIGNABLE_TYPE, classes = {OrderController.class}), @ComponentScan.Filter(type = ASSIGNABLE_TYPE, classes = {OrderService.class}), }, useDefaultFilters = false) public class MainConfig { @Bean public Person person(Pet pet) { return new Person("xiaorang", 18, pet); } @Bean public Pet pet() { return new Pet("xiaobai", 2); } @Bean(initMethod = "initMethod", destroyMethod = "destroyMethod") public Cat cat() { return new Cat(); } @Bean public Teacher teacher() { return new Teacher(); } @Bean public ConversionService conversionService() { DefaultFormattingConversionService conversionService = new DefaultFormattingConversionService(); conversionService.addConverter(new MyDateConverter("yyyy-MM-dd HH:mm:ss")); // 如果添加同种 String -> Date 的类型转换器,后面添加的会生效 // conversionService.addConverter(new MyDateConverter()); return conversionService; } }增加测试方法,如下所示:
java@Test public void test_06(ApplicationContext applicationContext) { OrderController orderController = applicationContext.getBean(OrderController.class); System.out.println(orderController); }测试结果如下所示:

❗ 需要注意的是,@Autowired 注解默认是按照类型进行装配的。那么当存在多个类型相同的组件时该如何进行装配呢? 举个栗子,当 OrderService 接口存在两个实现类 OrderServiceImpl1 和 OrderServiceImpl2 时,增加一个 OrderServiceImpl2 实现类,如下所示:
@Service
public class OrderServiceImpl2 implements OrderService {

}再次测试,测试结果如下所示:
发现抛出如上异常信息,OrderController 组件需要注入唯一的一个 OrderService 组件,但是却发现 2 个匹配的,那么此时该怎么办呢?有以下几种方案解决:
Important
@Autowired 注解默认是按照类型进行装配的,当找到多个相同类型的组件时,将继续按照属性名称去匹配。
修改属性名称,修改 OrderController 类中的 orderService 属性名改成 orderServiceImpl1;
java@Controller public class OrderController { // 提示不建议使用字段注入 // @Autowired private OrderService orderServiceImpl1; public OrderService getOrderServiceImpl1() { return orderServiceImpl1; } @Autowired public void setOrderServiceImpl1(OrderService orderServiceImpl1) { this.orderServiceImpl1 = orderServiceImpl1; } @Override public String toString() { return "OrderController{" + "orderService=" + orderServiceImpl1 + '}'; } }搭配 @Qualifier 注解一起使用,可以明确指定需要装配哪个组件
java@Controller public class OrderController { // 提示不建议使用字段注入 // @Autowired private OrderService orderService; public OrderService getOrderService() { return orderService; } @Autowired @Qualifier("orderServiceImpl1") public void setOrderService(OrderService orderService) { this.orderService = orderService; } @Override public String toString() { return "OrderController{" + "orderService=" + orderService + '}'; } }在组件上标注 @Primary 注解,当存在多个类型相同的组件时,则会优先注入标注了 @Primary 注解的组件
java@Service @Primary public class OrderServiceImpl1 implements OrderService { }
需要注意的是,当属性名与 @Primary 注解一起使用时,以 @Primary 注解为主;当 @Qualifier 注解与 @Primary 注解一起使用时,以 @Qualifier 注解为主;因为 @Autowired 注解中的 required 属性默认为 true,表示必须找到某个 bean 完成依赖注入,如果找不到的话,则会直接抛出异常!如果不想抛出异常,只需要将 required 属性置为 false 即可。
Tip
@Autowired 注解虽然可以标注在方法、参数、字段以及注解上,但是阿里巴巴手册建议咱们将 @Autowired 注解标注在构造方法上,如果标注在构造方法上,那么构造方法中的参数会从 IoC 容器中获取,而且当只有一个有参构造方法,那么构造方法上标注的 @Autowired 注解可以省略。
将 OrderController 类改造成如下形式:
@Controller
public class OrderController {
    private final OrderService orderService;

    public OrderController(@Qualifier("orderServiceImpl1") OrderService orderService) {
        this.orderService = orderService;
    }

    @Override
    public String toString() {
        return "OrderController{" +
                "orderService=" + orderService +
                '}';
    }
}@Resource
Core Technologies - Injection with @Resource
@Target({TYPE, FIELD, METHOD})
@Retention(RUNTIME)
@Repeatable(Resources.class)
public @interface Resource {
    /**
     * The JNDI name of the resource.  For field annotations,
     * the default is the field name.  For method annotations,
     * the default is the JavaBeans property name corresponding
     * to the method.  For class annotations, there is no default
     * and this must be specified.
     */
    String name() default "";

    /**
     * The name of the resource that the reference points to. It can
     * link to any compatible resource using the global JNDI names.
     *
     * @since 1.7, Common Annotations 1.1
     */

    String lookup() default "";

    /**
     * The Java type of the resource.  For field annotations,
     * the default is the type of the field.  For method annotations,
     * the default is the type of the JavaBeans property.
     * For class annotations, there is no default and this must be
     * specified.
     */
    Class<?> type() default java.lang.Object.class;

    /**
     * The two possible authentication types for a resource.
     */
    enum AuthenticationType {
	    CONTAINER,
	    APPLICATION
    }

    /**
     * The authentication type to use for this resource.
     * This may be specified for resources representing a
     * connection factory of any supported type, and must
     * not be specified for resources of other types.
     */
    AuthenticationType authenticationType() default AuthenticationType.CONTAINER;

    /**
     * Indicates whether this resource can be shared between
     * this component and other components.
     * This may be specified for resources representing a
     * connection factory of any supported type, and must
     * not be specified for resources of other types.
     */
    boolean shareable() default true;

    /**
     * A product-specific name that this resource should be mapped to.
     * The <code>mappedName</code> element provides for mapping the
     * resource reference to the name of a resource known to the
     * applicaiton server.  The mapped name could be of any form.
     * <p>Application servers are not required to support any particular
     * form or type of mapped name, nor the ability to use mapped names.
     * The mapped name is product-dependent and often installation-dependent.
     * No use of a mapped name is portable.</p>
     */
    String mappedName() default "";

    /**
     * Description of this resource.  The description is expected
     * to be in the default language of the system on which the
     * application is deployed.  The description can be presented
     * to the Deployer to help in choosing the correct resource.
     */
    String description() default "";
}由 @Resource 注解的定义可知,该注解可以标注在类、字段以及方法上。该注解属于 JSR250 规范中定义的一个注解,注解中有两个重要的属性 name 和 type。
- 如果同时指定了 name 属性 和 type 属性,则从 IoC 容器中找一个名称与 name 属性并且类型与 type 属性都相同的组件,找不到则报错;
- 如果只指定了 name 属性,则从 IoC 容器中找一个名称与 name 属性相同的组件,找不到则报错;
- 如果只指定了 type 属性,则从 IoC 容器中找一个类型与 type 属性相同的组件,找不到或者找到多个类型相同的组件则报错;
- 如果两个属性都没有指定,则默认按照名称进行装配,如果按名称找不到则按类型进行装配,如果找到多个类型相同的组件则判断其中某个组件上是否存在标注 @Primary 注解,如果不存在的话,则报找到多个组件的异常;最后,如果按类型还是找不到则报错;
为了测试 @Resource 注解,修改原有的 OrderController 和 OrderServiceImpl1 类(去除标注的 @Primary 注解),如下所示:
@Controller
public class OrderController {
    @Resource
    private OrderService orderService;

    public OrderService getOrderService() {
        return orderService;
    }

    public void setOrderService(OrderService orderService) {
        this.orderService = orderService;
    }

    @Override
    public String toString() {
        return "OrderController{" +
        "orderService=" + orderService +
        '}';
    }
}@Service
public class OrderServiceImpl1 implements OrderService {
}再次测试,测试结果如下所示:
发现抛出如上异常信息,OrderController 组件需要注入唯一的一个 OrderService 组件,但是却发现 2 个匹配的,那么此时该怎么办呢?有以下几种方案解决:
在 @Autowired 注解中的解决方案在此处都适用,如修改属性名,搭配 @Qualifier 注解一起使用或者在组件上标注 @Primary 注解;
指定 @Reaource 注解中的 name 属性;
java@Controller public class OrderController { @Resource(name = "orderServiceImpl1") private OrderService orderService; public OrderService getOrderService() { return orderService; } public void setOrderService(OrderService orderService) { this.orderService = orderService; } @Override public String toString() { return "OrderController{" + "orderService=" + orderService + '}'; } }再次测试,测试结果如下所示:

@Inject
Core Technologies - Dependency Injection with @Inject and @Named
Spring 提供了对 JSR-330 标准注解(依赖注入)的支持,想使用 @Inject 注解需要引入如下依赖:
<dependency>
    <groupId>javax.inject</groupId>
    <artifactId>javax.inject</artifactId>
    <version>1</version>
</dependency>@Inject 注解的定义如下所示:
@Target({ METHOD, CONSTRUCTOR, FIELD })
@Retention(RUNTIME)
@Documented
public @interface Inject {}由 @Inject 注解的定义可知,该注解可以标注在方法、构造方法以及字段上。该注解可以代替 @Autowired 注解,搭配 @Named 注解(与 Qualifier 注解功能一样)一起使用,可以明确指定需要装配哪个组件,如下所示:
@Controller
public class OrderController {
    private OrderService orderService;

    public OrderService getOrderService() {
        return orderService;
    }

    @Inject
    @Named("orderServiceImpl2")
    public void setOrderService(OrderService orderService) {
        this.orderService = orderService;
    }

    @Override
    public String toString() {
        return "OrderController{" +
        "orderService=" + orderService +
        '}';
    }
}再次测试,测试结果如下所示:
其他
TODO
- @Conditional
- @ImportResource
- @PropertySource
- @ConfigurationProperties + @EnableConfigurationProperties
- @Scope
- @Lazy
- @profile