Uniapp 工程化模板搭建
创建项目
除了HBuilderX可视化界面,也可以使用 cli 脚手架,可以通过 vue-cli 创建 uni-app 项目。
具体步骤如下所示:
使用
npm install -g @vue/cli命令全局安装vue-cli。使用 Vue3/Vite 版,创建以 typescript 开发的工程,运行
npx degit dcloudio/uni-preset-vue#vite-ts uniapp-vue3-ts-starter命令,其中uniapp-vue3-ts-starter为项目名称,可以进行更换。参考自 uni-app官网,效果如下所示:
如果命令行创建失败,请直接访问 gitee 下载模板。
Note
- Vue3/Vite 版要求 node 版本
^14.18.0 || >=16.0.0 - 如果使用 HBuilderX(3.6.7以下版本)运行 Vue3/Vite 创建的最新的 cli 工程,需要在 HBuilderX 运行配置最底部设置 node 路径为自己本机高版本 node 路径(注意需要重启 HBuilderX 才可以生效)
- HBuilderX Mac 版本菜单栏左上角 HBuilderX->偏好设置->运行配置->node路径
- HBuilderX Windows 版本菜单栏 工具->设置->运行配置->node路径
- Vue3/Vite 版要求 node 版本
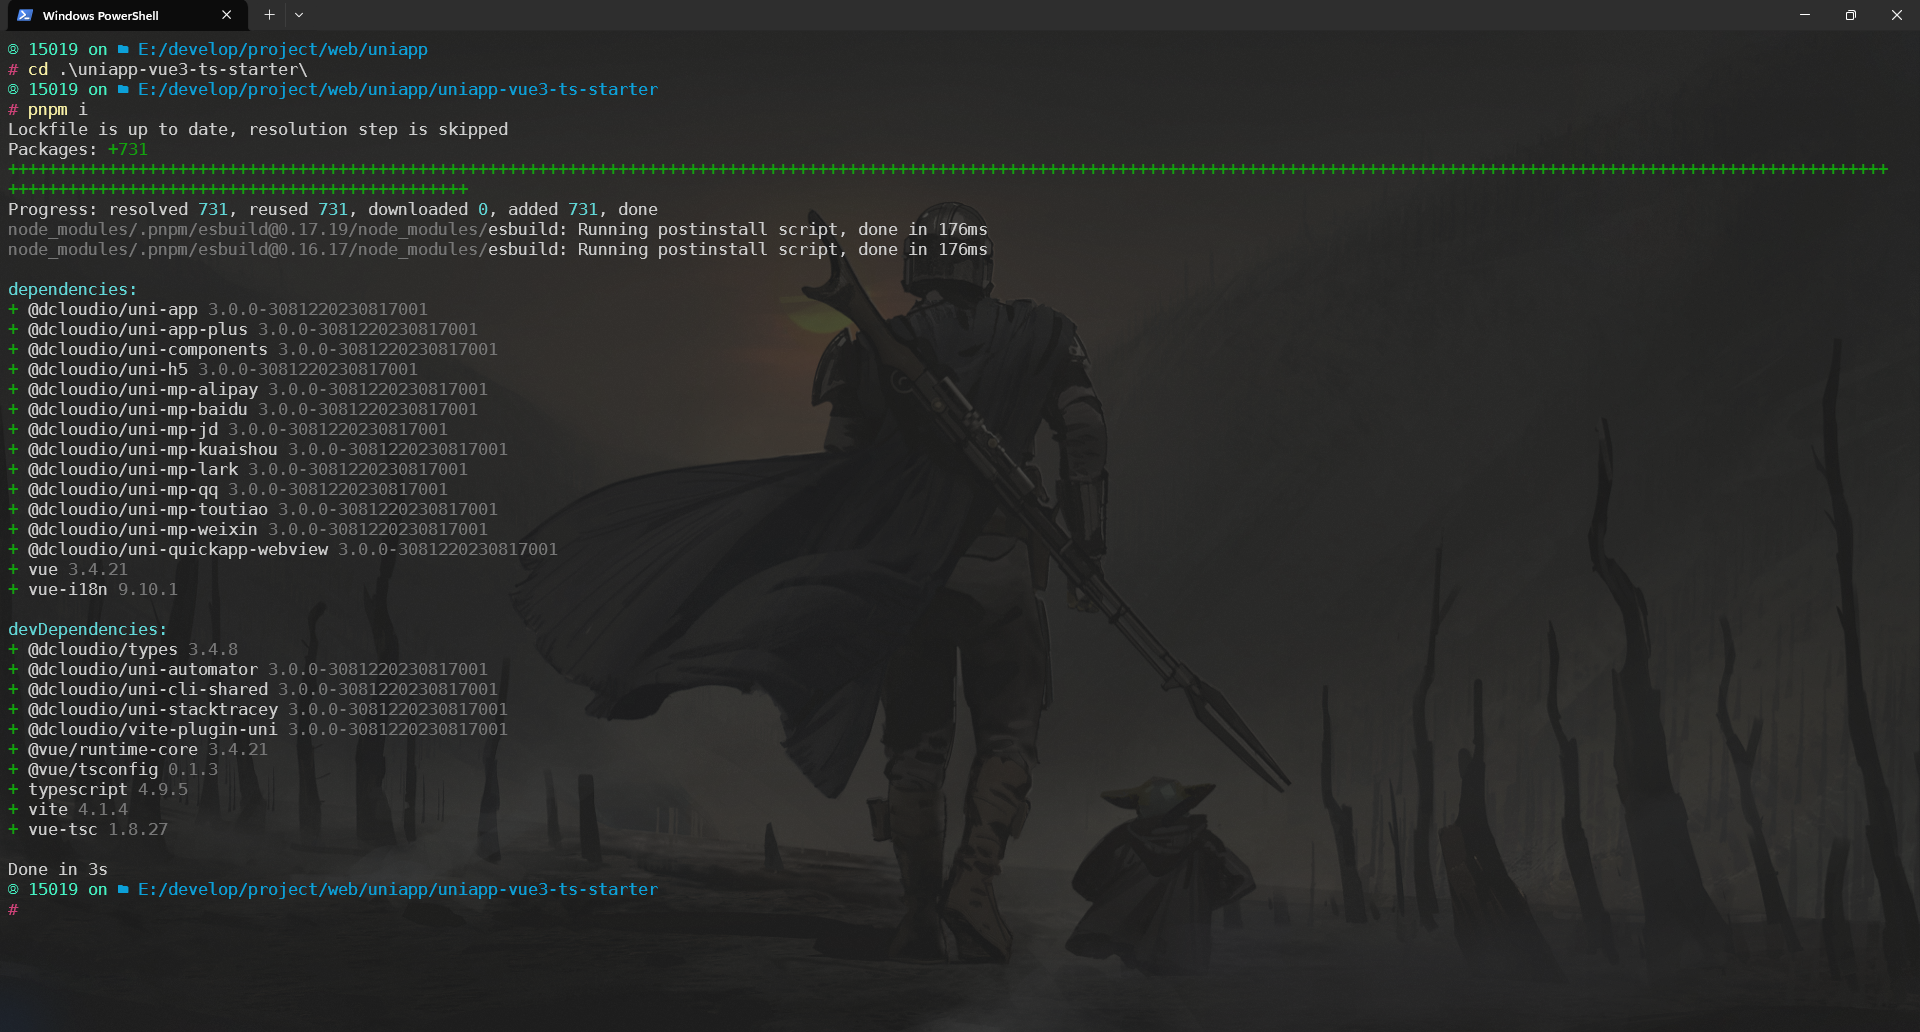
在项目被创建后,通过以下步骤安装依赖,如下所示:
运行项目
在微信开发者工具里运行,存在 HBuilderX 和 命令行两种方式,其实两者并没有本质上的区别,任选其中一种即可。
Tip
使用 HBuilderX 进行开发的小伙伴可以选择第一种运行方式,而使用 VSCode 进行开发的小伙伴推荐使用命令行的方式运行项目。
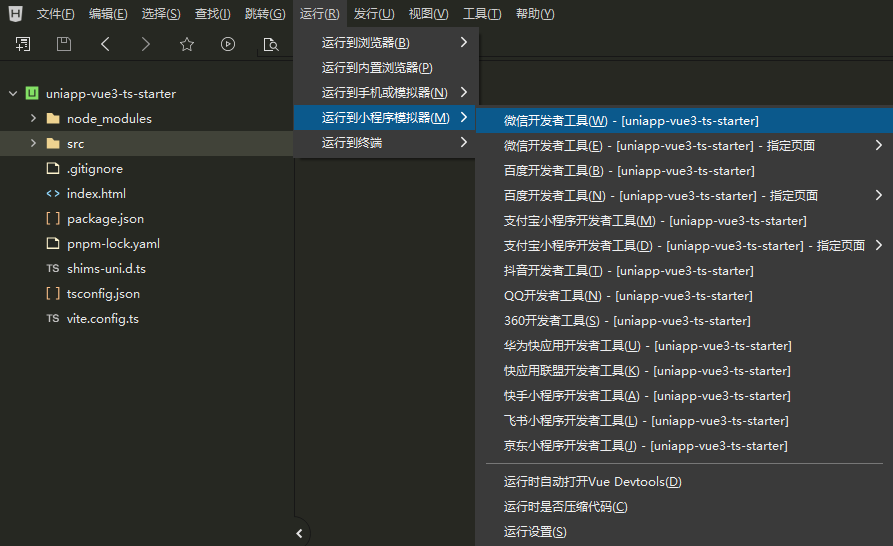
使用 HBuilderX 打开刚才创建的项目,点击工具栏的运行 -> 运行到小程序模拟器 -> 微信开发者工具,即可在微信开发者工具里面体验 uni-app,如下所示:
点击运行之后,会在 HBuilderX 终端中会输出如下信息:
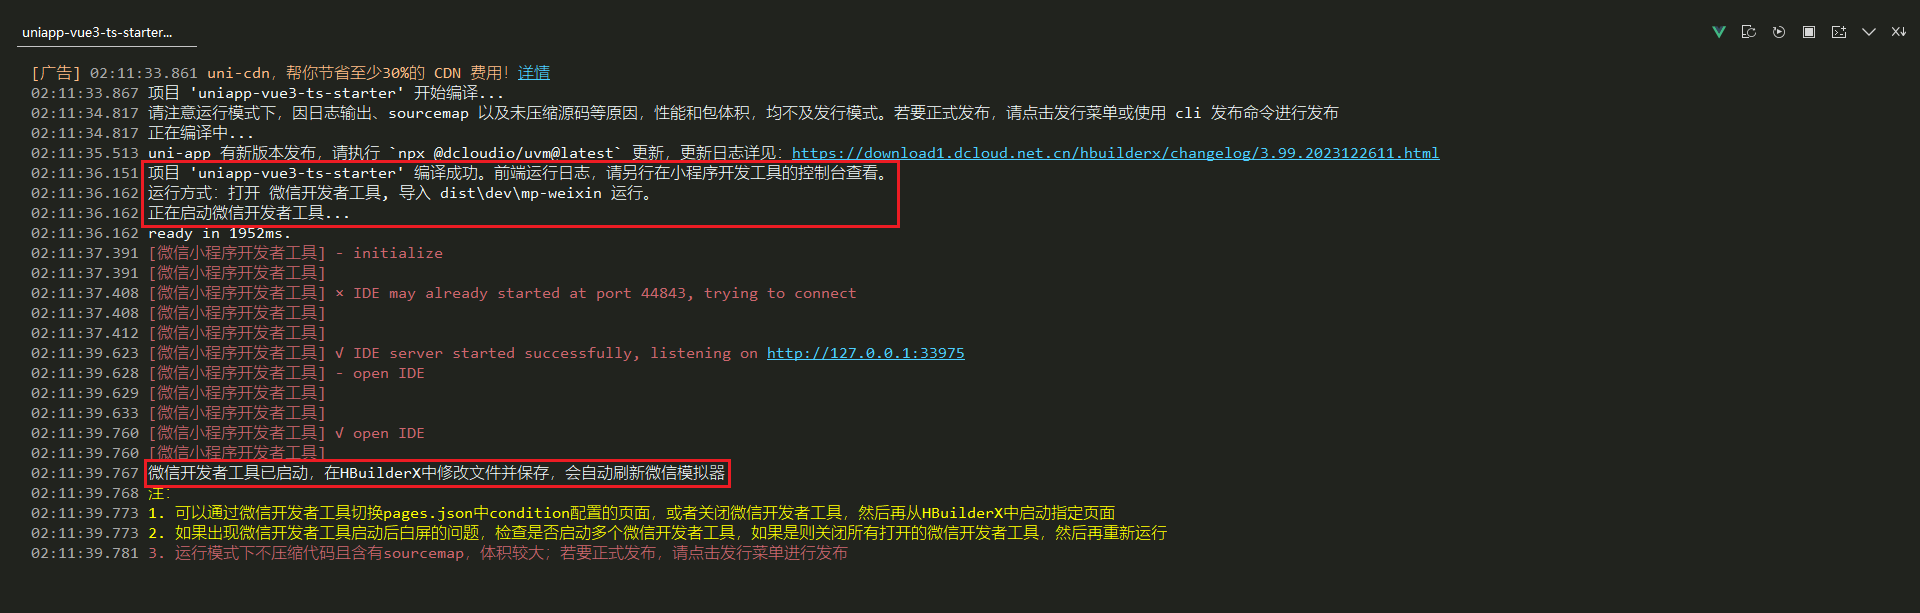
根据上图所示,可以得出如下结论:
编译项目之后,会在项目根目录下生成一个
dist\dev\mp-weixin目录;会自动打开微信开发者工具并导入
dist\dev\mp-weixin目录运行;Tip
如果自动启动小程序开发工具失败,请手动启动小程序开发工具并将 HBuilderX 控制台提示的项目路径,打开项目。
在 HBuilderX 中修改文件并保存,会自动刷新微信模拟器;
Note
- 如果是第一次使用,需要配置开发工具的相关路径。点击工具栏的运行 -> 运行到小程序模拟器 -> 运行设置,配置相应小程序开发者工具的路径,才能运行成功。如下图所示,需在输入框输入微信开发者工具的安装路径。

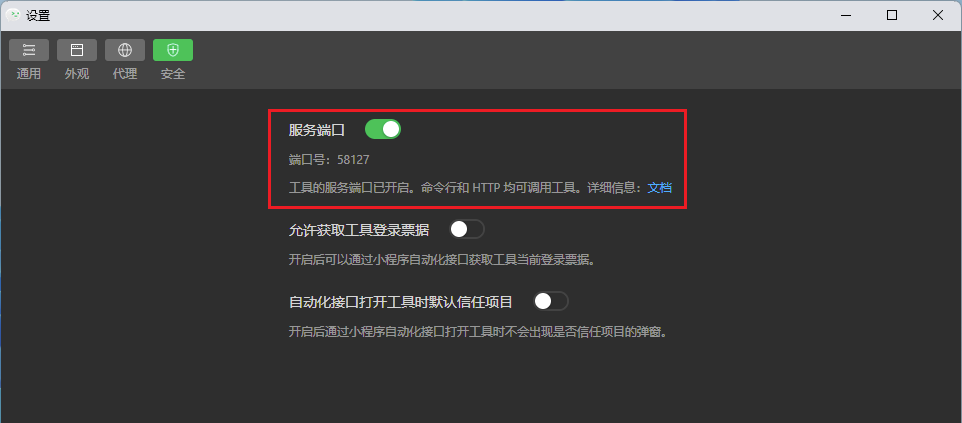
- 微信开发者工具需要开启服务端口,在微信开发者工具的设置 -> 安全中。
在终端中进入当前项目,直接使用
pnpm run dev:mp-weixin命令运行该项目,如下所示: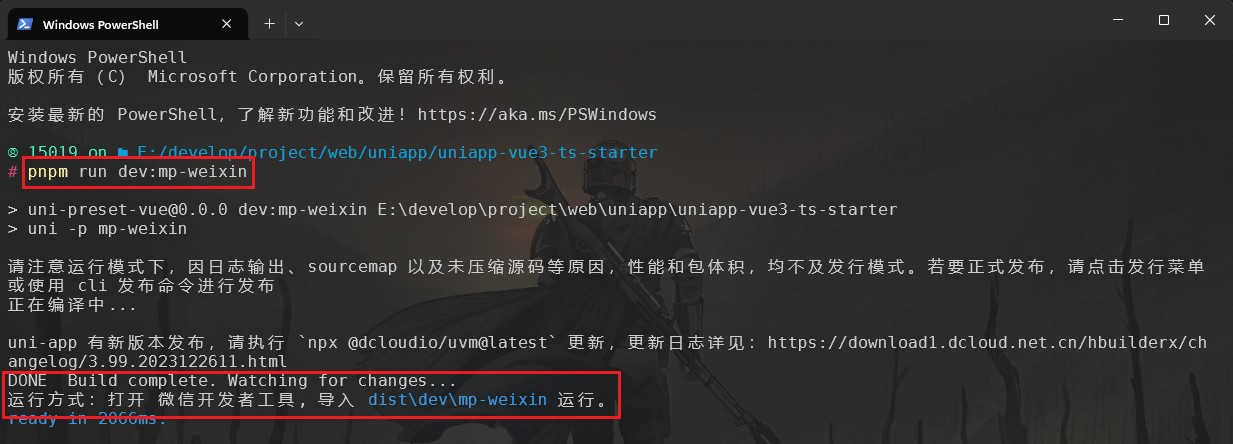
根据上图所示,可以得出如下结论:
- 编译项目之后,同样会在项目根目录下生成一个
dist\dev\mp-weixin目录; - 使用命令行的方式运行项目不会自动打开微信开发者工具,需要咱们手动打开微信开发者工具,然后手动导入
dist\dev\mp-weixin目录进行运行。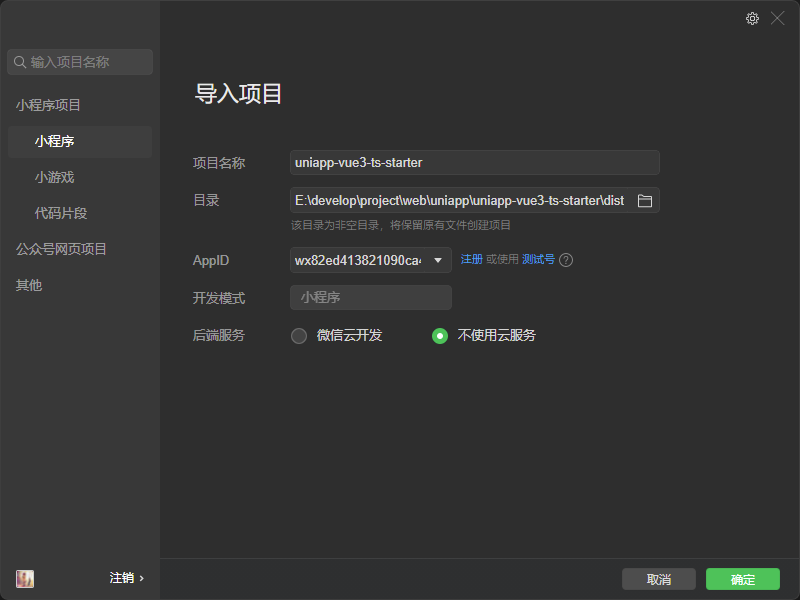
- 当咱们更新文件时会进行差量编译项目并自动刷新微信模拟器;
- 编译项目之后,同样会在项目根目录下生成一个
推荐插件安装
VSCode 推荐安装插件:
- Chinese (Simplified) (简体中文) Language Pack for Visual Studio Code - Visual Studio Marketplace
- EditorConfig for VS Code
- ESLint
- ESLint Chinese Rules
- Prettier - Code formatter
- Vue - Official - Visual Studio Marketplace
- Vue VSCode Snippets - Visual Studio Marketplace
- Error Lens - Visual Studio Marketplace
- Auto Close Tag - Visual Studio Marketplace
- Auto Rename Tag - Visual Studio Marketplace
- uni-create-view
- uni-helper
- uniapp 小程序扩展
在项目根目录下创建 .vscode/extensions.json 文件,内容如下所示:
{
  "recommendations": [
    "ms-ceintl.vscode-language-pack-zh-hans",
    "editorconfig.editorconfig",
    "dbaeumer.vscode-eslint",
    "maggie.eslint-rules-zh-plugin",
    "esbenp.prettier-vscode",
    "usernamehw.errorlens",
    "formulahendry.auto-close-tag",
    "formulahendry.auto-rename-tag",
    "mrmaoddxxaa.create-uniapp-view",
    "uni-helper.uni-helper-vscode",
    "evils.uniapp-vscode"
  ]
}这样团队其他小伙伴在拉取代码使用 VSCode 打开之后,在扩展中输入 @recommended 就会推荐安装这些插件。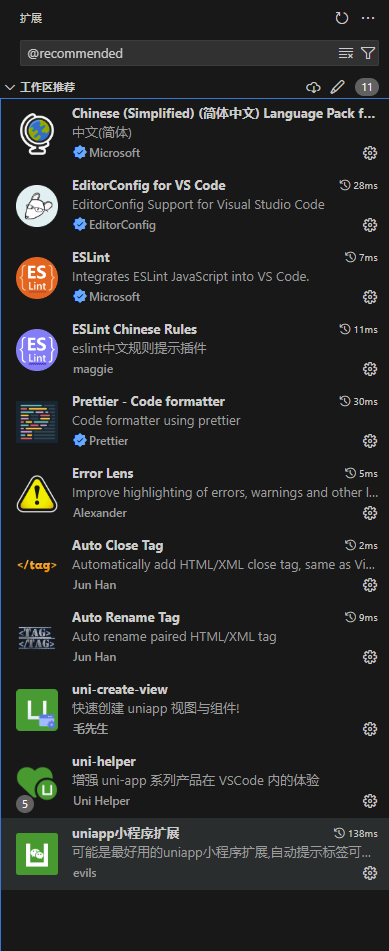
协作规范
Editor Config
在项目根目录下创建 .editorconfig 配置文件,即可让项目下所有文件都统一代码风格!
# EditorConfig is awesome: https://EditorConfig.org

# top-most EditorConfig file
root = true

[*]
charset = utf-8
end_of_line = lf
indent_size = 2
indent_style = space
insert_final_newline = true
max_line_length = 80
trim_trailing_whitespace = true

[*.md]
max_line_length = 0
trim_trailing_whitespace = falseESLint
ESLint 是一个查找 JavaScript / TypeScript 代码问题并提供修复建议的工具,换句话说就是可以约束的代码不会写出一堆 BUG ,它是代码健壮性的重要保障。
虽然大部分前端开发者都不愿意接受这些约束,但说实话,经过 ESLint 检查过的代码质量真的高了很多,如果不愿意总是做一个游兵散勇,建议努力让自己习惯被 ESLint 检查,大厂和大项目都是有 ESLint 检查的。
特别是写 TypeScript,配合 ESLint 的检查实在太爽了(字面意思,真的很舒服)。
通过脚手架创建的项目通常都会帮配置好 ESLint 规则,如果有一些项目是一开始没有,后面想增加 ESLint 检查,也可以手动配置具体规则。
使用
pnpm create @eslint/config@latest命令安装与配置 ESLint,参考自 Getting Started with ESLint - ESLint - Pluggable JavaScript Linter,如下所示: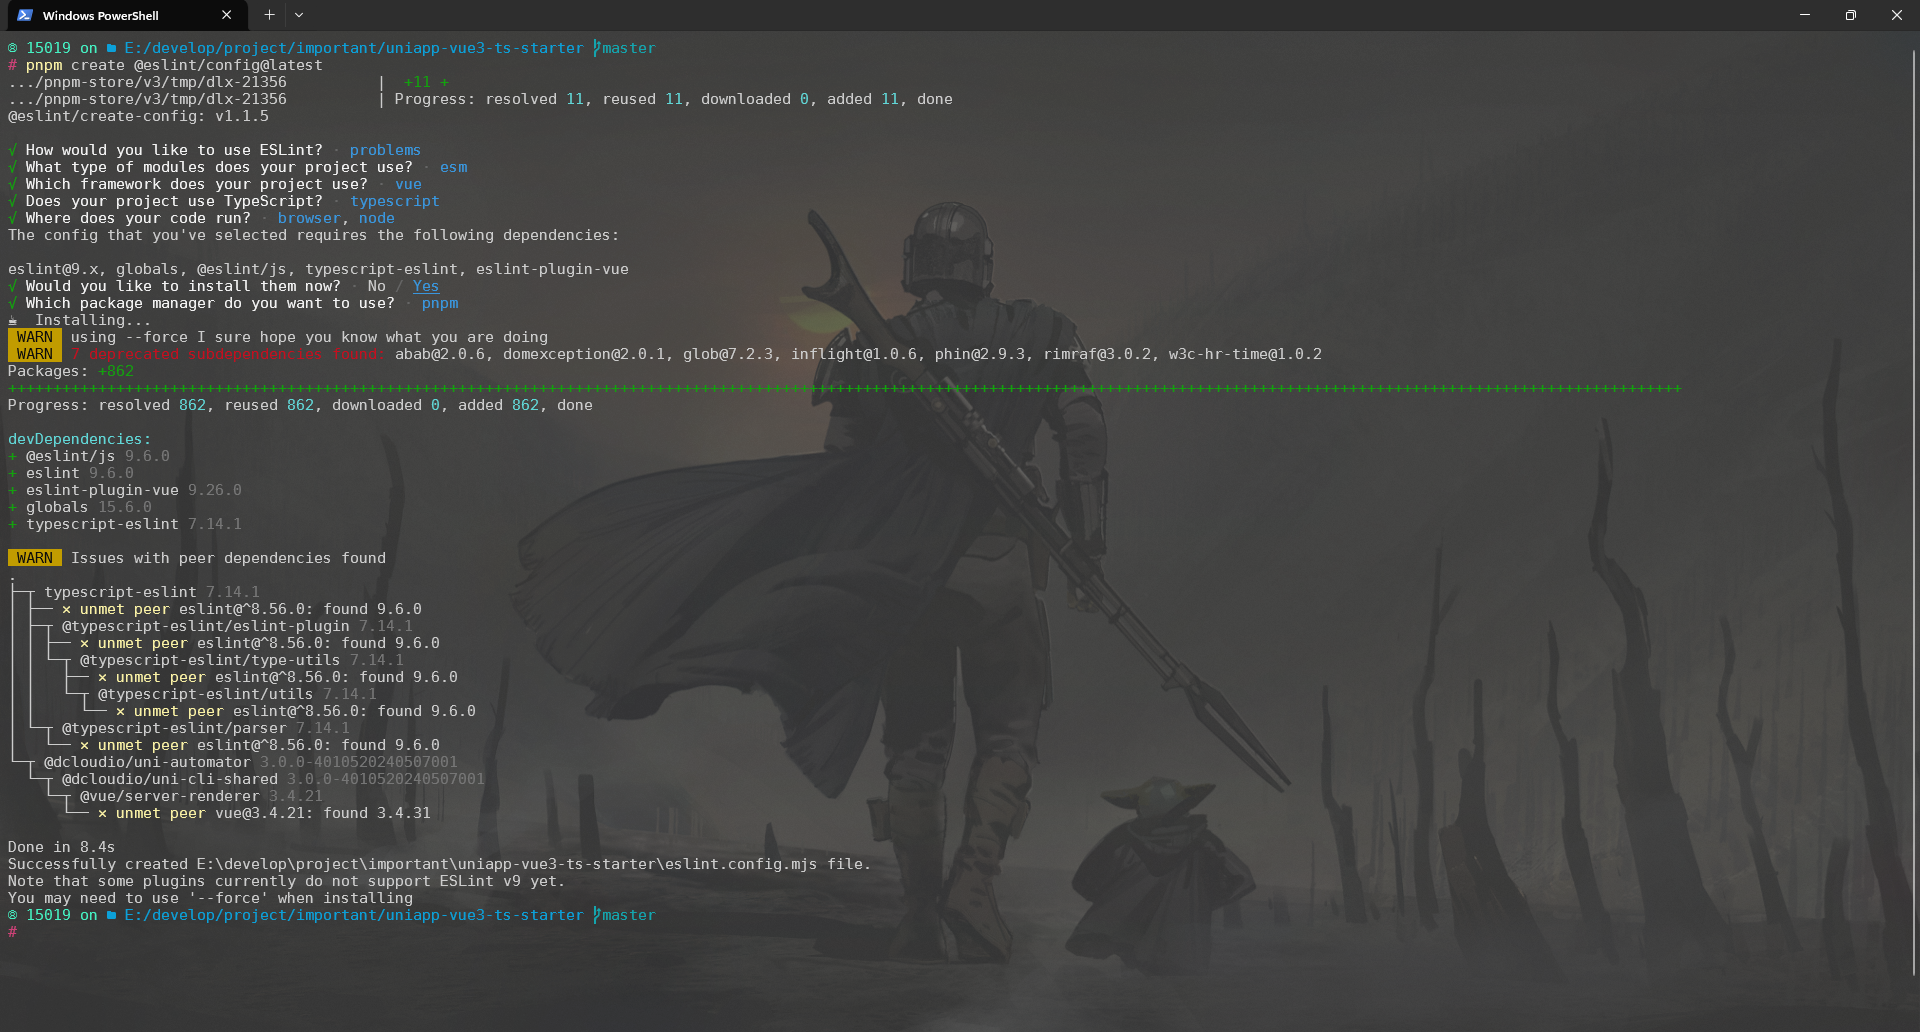
Tip
执行该初始化命令除了会添加相关开发依赖之外,还会在项目根目录下创建一个
eslint.config.mjs配置文件。根据 Vue3 官方文档中 代码规范 | 工具链 | Vue.js (vuejs.org) 的描述,如下所示:
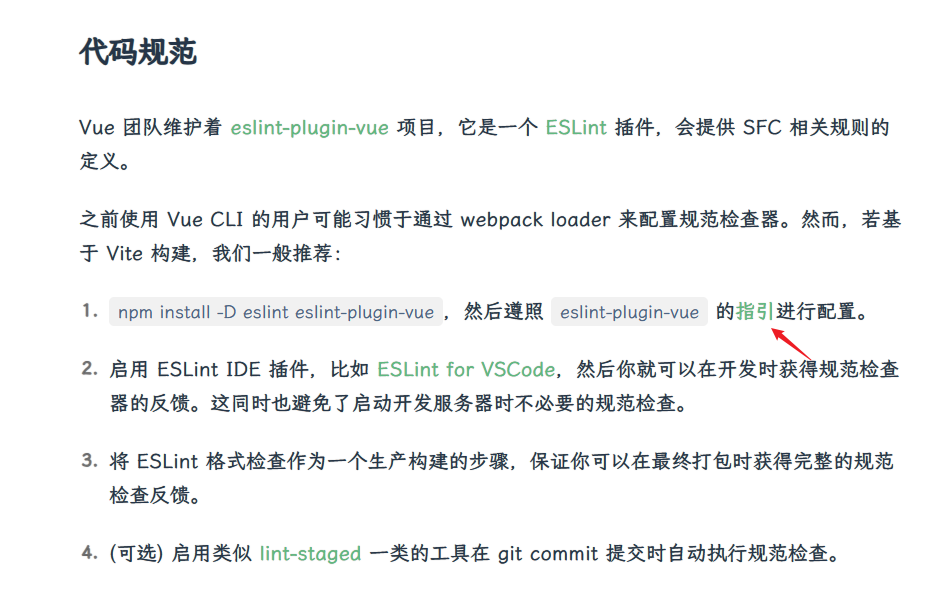
Vue 团队维护着 eslint-plugin-vue 项目,它是一个 ESLint 插件,会提供 SFC 相关规则的定义。咱们在上一步初始化完毕后就已自动安装
eslint-plugin-vue插件,紧接着咱们只需遵照eslint-plugin-vue的指引进行配置,选择最为严格的*.configs["flat/recommended"]规则。jsimport globals from "globals"; import pluginJs from "@eslint/js"; import tseslint from "typescript-eslint"; import pluginVue from "eslint-plugin-vue"; export default [ {files: ["**/*.{js,mjs,cjs,ts,vue}"]}, {languageOptions: {globals: {...globals.browser, ...globals.node}}}, pluginJs.configs.recommended, ...tseslint.configs.recommended, ...pluginVue.configs["flat/essential"], ...pluginVue.configs["flat/recommended"], // 忽略文件 { ignores: ["src/uni_modules/", "dist/"] }, ];对于一些不符合规范的简单的错误,如果一个个进行手动检查修复的话就太麻烦了!此时咱们可以使用
npx eslint --fix命令完成错误检查并自动修复,对于一些无法自动修复的错误则会在终端中进行输出,如下所示:
那么这个错误该如何解决呢?在
eslint.config.mjs配置文件的rules选项中添加'vue/multi-word-component-names': 'off',禁用该规则即可!如下所示:jsimport globals from "globals"; import pluginJs from "@eslint/js"; import tseslint from "typescript-eslint"; import pluginVue from "eslint-plugin-vue"; export default [ {files: ["**/*.{js,mjs,cjs,ts,vue}"]}, {languageOptions: {globals: {...globals.browser, ...globals.node}}}, pluginJs.configs.recommended, ...tseslint.configs.recommended, ...pluginVue.configs["flat/essential"], // 忽略文件 { ignores: ["src/uni_modules/", "dist/"] }, // 配置规则 { rules: { "vue/multi-word-component-names": "off", } }, ];再次运行
npx eslint --fix命令可以发现不再报错!
Prettier
Prettier 是目前最流行的代码格式化工具,可以约束的代码风格不会乱七八糟,目前所知道的知名项目(如 Vue、Vite、React 等)和大厂团队(谷歌、微软、阿里、腾讯等)都在使用 Prettier 格式化代码。
通过脚手架创建的项目很多都内置了 Prettier 功能集成(参考了主流的格式化规范,比如 2 个空格的缩进、无需写分号结尾、数组 / 对象每一项都带有尾逗号等等)。
根据官方文档 Install · Prettier 可知,使用
pnpm add --save-dev --save-exact prettier命令安装 Prettier。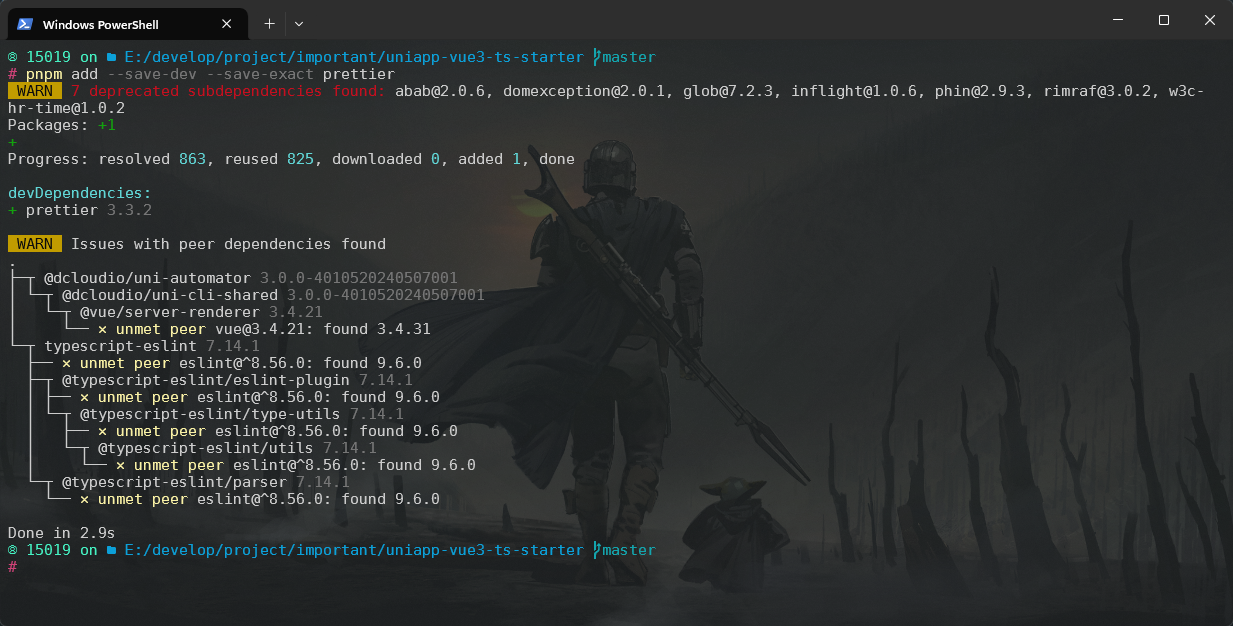
在项目根目录下创建一个名为
.prettierrc.js的配置文件,文件内容如下所示:js// 参考文档:https://www.prettier.cn/docs/options.html module.exports = { // 一行代码的最大字符数,默认是80 printWidth: 80, // tab宽度为2空格 tabWidth: 2, // 是否使用tab来缩进 useTabs: false, // 结尾是否添加分号 semi: false, // 是否使用单引号 singleQuote: true, // 对象属性的引号使用,可选值"<as-needed|consistent|preserve>" // as-needed只有在需求要的情况下加引号,consistent是有一个需要引号就统一加,preserve是保留用户输入的引号 quoteProps: 'as-needed', // 多行时尽可能打印尾随逗号,可选值"<none|es5|all>" trailingComma: 'es5', // 字面量对象括号中的空格,如 { foo: bar } bracketSpacing: true, // 箭头函数单个参数的情况是否省略括号,可选值"<always|avoid>",默认always为总是带括号,如 (x) => x arrowParens: 'always', // 行尾换行符,可选值"<lf|crlf|cr|auto>" endOfLine: 'lf', }这里只需要写入与默认配置不同的选项即可,如果和默认配置一致,可以省略,完整的配置选项以及默认值可以在 Prettier 官网的 Options Docs 查看。
现在可以使用
pnpm exec prettier . --write命令格式化所有的文件,如下所示: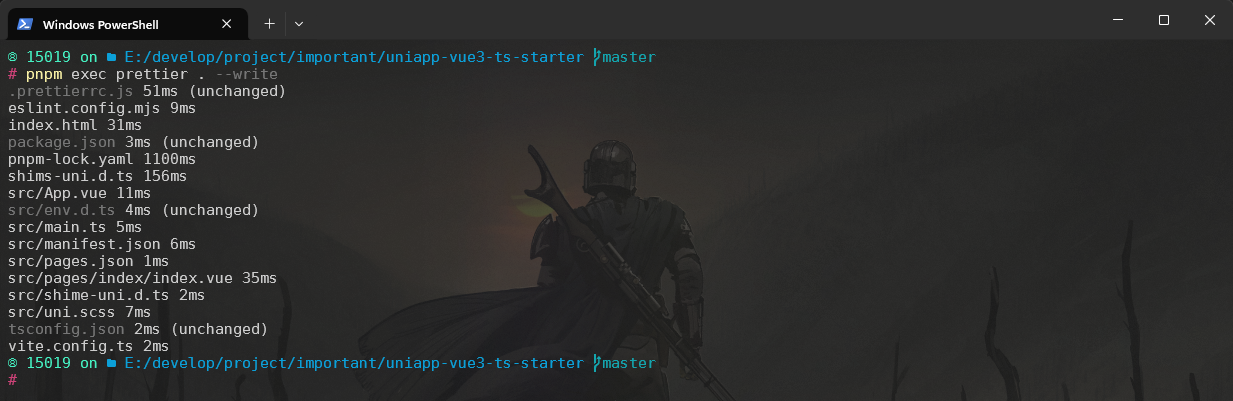
从命令行进行格式化是一个很好的入门方式,但你可以通过键盘快捷键或在保存文件时自动从编辑器运行它来充分利用 Prettier。当一行在编码时变得太长以至于不适合你的屏幕时,只需按下一个键,即可观看它神奇地被包裹成多行!或者,当你粘贴一些代码并且缩进全部搞砸时,让 Prettier 为你修复它,而无需离开你的编辑器。
配合 VSCode 的 VsCode Prettier 扩展,可以很方便地在编辑器里使用该规则格式化文件。
如果你使用 ESLint,请安装 eslint-config-prettier,以使 ESLint 和 Prettier 相互配合。它会关闭所有不必要的或可能与 Prettier 冲突的 ESLint 规则。需要使用
pnpm add --save-dev eslint-plugin-prettier eslint-config-prettier命令安装 prettier/eslint-config-prettier: Turns off all rules that are unnecessary or might conflict with Prettier. (github.com) 和 prettier/eslint-plugin-prettier: ESLint plugin for Prettier formatting (github.com) 两个插件。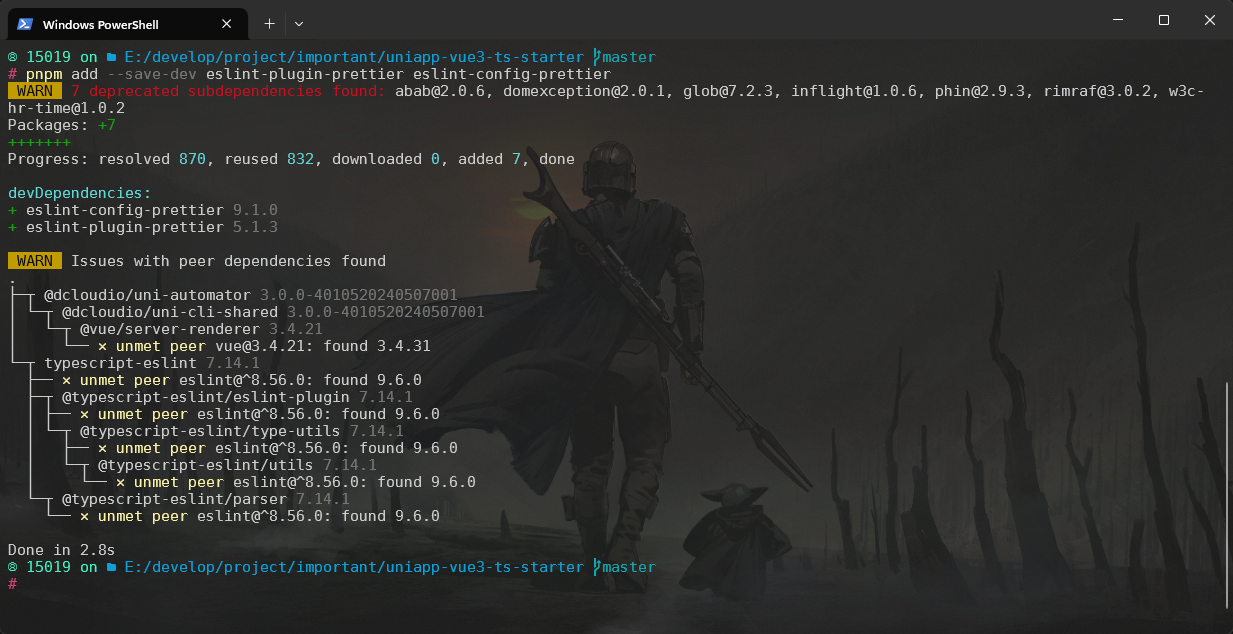
那么该如何配置呢?参考自 [eslint-plugin-prettier/Configuration (new:
eslint.config.js)],导入eslint-plugin-prettier/recommended并将其作为配置数组中的最后一项添加到eslint.config.mjs文件中,以便eslint-config-prettier有机会覆盖其他配置:jsimport eslintPluginPrettierRecommended from 'eslint-plugin-prettier/recommended' export default [ {files: ['**/*.{js,mjs,cjs,ts,vue}']}, {languageOptions: {globals: {...globals.browser, ...globals.node}}}, pluginJs.configs.recommended, ...tseslint.configs.recommended, ...pluginVue.configs["flat/recommended"], // eslint-plugin-prettier eslintPluginPrettierRecommended, // 忽略文件 { ignores: ['src/uni_modules/'], }, // 配置规则 { rules: { 'vue/multi-word-component-names': 'off', }, }, ]如果有一些文件需要排除,可以再创建一个
.prettierignore文件在项目根目录下,里面添加要排除的文件或者文件夹名称即可。src/uni_modules/
husky
Tip
文档地址:🐶 husky
如果仅有 eslint 和 prettier,那么咱们需要在代码提交之前手动执行 prettier 和 eslint 对代码进行格式化以及代码质量和格式检查,但是咱们希望在提交代码时自动执行 eslint 对代码进行检查,那么咱们可以使用 git 的 hook 功能,为 git 命令创建咱们所需要的钩子,在这里咱们使用 husky 工具来创建、管理代码仓库中所有的 git hooks。
通过 husky 工具来为咱们创建所需要的 git hook,首先需要执行 pnpm add -D husky 命令安装 husky,然后执行 pnpm exec husky init 命令启用 git hook。该命令主要做了如下两件事:
在
package.json中新增一个 prepare 脚本:"prepare": "husky",使得团队中其他小伙伴在克隆该项目并安装依赖时会自动通过 husky 启用 git hook。在
.husky/文件夹下创建一个pre-commit脚本,用于在提交(commit)之前执行脚本中的内容。咱们需要修改该脚本中默认生成的内容,使其支持在提交之前执行咱们的 eslint 工具对代码进行质量和格式检查,内容如下所示:#!/usr/bin/env sh . "$(dirname -- "$0")/_/husky.sh" npx eslint --fix
此时,在 main.ts 文件中定义不使用的变量,使其不符合 eslint 规范,然后通过 git add . 命令将工作区的代码全部保存到暂存区之后使用 git commit 命令进行提交,从终端中可以看到,确实是先执行 npx eslint --fix,然后 eslint 输出了错误信息并且中断了 git commit 过程,这非常好,符合咱们的预期!如下所示: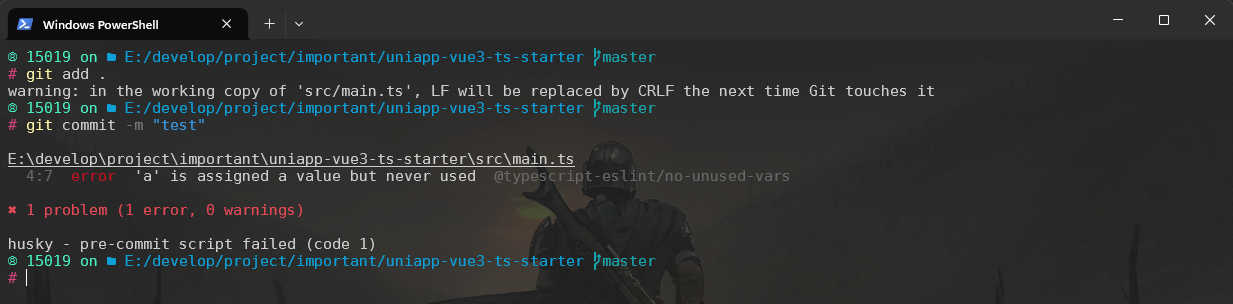
lint-staged
随着代码存储库的代码量增多,如果在每一次提交代码时,咱们都对存储库内的全量代码执行 prettier 和 eslint 命令,则必然会性能吃紧,所以,咱们希望提交代码时只对当前发生了代码变更的文件执行 prettier 和 eslint 命令,同时略过咱们所忽略的文件,那么咱们就需要用上 lint-staged 工具。
首先执行 pnpm add -D lint-staged 命令安装 lint-staged,安装完成之后, 然后配置 package.json 文件,如下所示:
{
  // ...

  "lint-staged": {
    "**/*.{html,vue,ts,cjs,json,md}": [
      "prettier --write"
    ],
    "**/*.{vue,js,ts,jsx,tsx}": [
      "eslint --fix"
    ],
  },

  // ...
}此外,咱们还需要手动更改一下 husky 为咱们创建的 pre-commit 这个 git hook,将其变更为执行 lint-staged 命令,如下所示:
#!/usr/bin/env sh
. "$(dirname -- "$0")/_/husky.sh"

npx --no-install -- lint-staged再次提交代码,效果如下所示: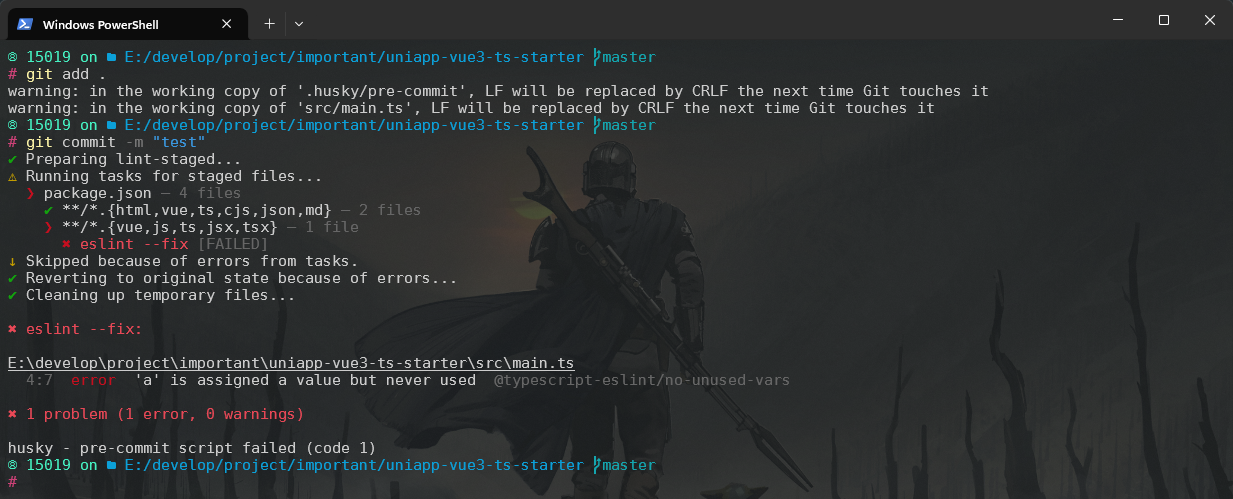
commitlint
commitlint 结合 husky 可以在 git commit 时校验 commit 信息是否符合规范。
安装:使用
pnpm add -D commitlint @commitlint/config-conventional @commitlint/cli命令安装 commitlint;配置:在项目根目录下创建
.commitlintrc.cjs文件,内容如下所示:jsonconst fs = require('fs') const path = require('path') const { execSync } = require('child_process') const scopes = fs .readdirSync(path.resolve(__dirname, 'src'), { withFileTypes: true }) .filter((dirent) => dirent.isDirectory()) .map((dirent) => dirent.name.replace(/s$/, '')) // precomputed scope const scopeComplete = execSync('git status --porcelain || true') .toString() .trim() .split('\n') .find((r) => ~r.indexOf('M src')) ?.replace(/(\/)/g, '%%') ?.match(/src%%((\w|-)*)/)?.[1] ?.replace(/s$/, '') module.exports = { ignores: [(commit) => commit.includes('init')], extends: ['@commitlint/config-conventional'], rules: { 'body-leading-blank': [2, 'always'], 'footer-leading-blank': [1, 'always'], 'header-max-length': [2, 'always', 108], 'subject-empty': [2, 'never'], 'type-empty': [2, 'never'], 'subject-case': [0], 'type-enum': [ 2, 'always', [ 'feat', 'fix', 'perf', 'style', 'docs', 'test', 'refactor', 'build', 'ci', 'chore', 'revert', 'wip', 'workflow', 'types', 'release', ], ], }, prompt: { /** @use `pnpm commit :f` */ alias: { f: 'docs: fix typos', r: 'docs: update README', s: 'style: update code format', b: 'build: bump dependencies', c: 'chore: update config', }, customScopesAlign: !scopeComplete ? 'top' : 'bottom', defaultScope: scopeComplete, scopes: [...scopes, 'mock'], allowEmptyIssuePrefixs: false, allowCustomIssuePrefixs: false, // English typesAppend: [ { value: 'wip', name: 'wip: work in process' }, { value: 'workflow', name: 'workflow: workflow improvements' }, { value: 'types', name: 'types: type definition file changes' }, ], // 中英文对照版 // messages: { // type: '选择你要提交的类型 :', // scope: '选择一个提交范围 (可选):', // customScope: '请输入自定义的提交范围 :', // subject: '填写简短精炼的变更描述 :\n', // body: '填写更加详细的变更描述 (可选)。使用 "|" 换行 :\n', // breaking: '列举非兼容性重大的变更 (可选)。使用 "|" 换行 :\n', // footerPrefixsSelect: '选择关联issue前缀 (可选):', // customFooterPrefixs: '输入自定义issue前缀 :', // footer: '列举关联issue (可选) 例如: #31, #I3244 :\n', // confirmCommit: '是否提交或修改commit ?', // }, // types: [ // { value: 'feat', name: 'feat: 新增功能' }, // { value: 'fix', name: 'fix: 修复缺陷' }, // { value: 'docs', name: 'docs: 文档变更' }, // { value: 'style', name: 'style: 代码格式' }, // { value: 'refactor', name: 'refactor: 代码重构' }, // { value: 'perf', name: 'perf: 性能优化' }, // { value: 'test', name: 'test: 添加疏漏测试或已有测试改动' }, // { value: 'build', name: 'build: 构建流程、外部依赖变更 (如升级 npm 包、修改打包配置等)' }, // { value: 'ci', name: 'ci: 修改 CI 配置、脚本' }, // { value: 'revert', name: 'revert: 回滚 commit' }, // { value: 'chore', name: 'chore: 对构建过程或辅助工具和库的更改 (不影响源文件、测试用例)' }, // { value: 'wip', name: 'wip: 正在开发中' }, // { value: 'workflow', name: 'workflow: 工作流程改进' }, // { value: 'types', name: 'types: 类型定义文件修改' }, // ], // emptyScopesAlias: 'empty: 不填写', // customScopesAlias: 'custom: 自定义', }, }添加 git 钩子
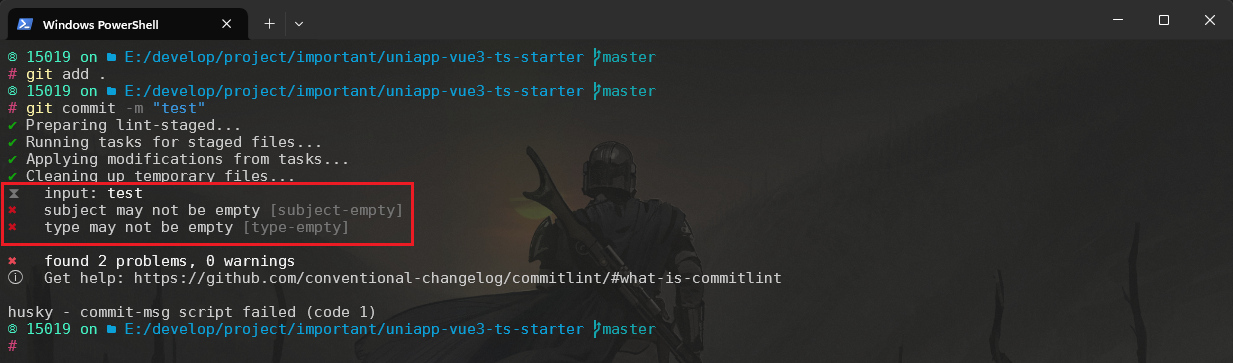
.husky/commit-msg,它的作用是在咱们提交 commit 或者修改 commit message 时执行相关校验,确保咱们的项目拥有一个统一的符合规范的 commit message,文件内容所示:#!/usr/bin/env sh . "$(dirname -- "$0")/_/husky.sh" npx --no-install commitlint --edit故意填写不符合规范的提交信息,测试效果如下所示:
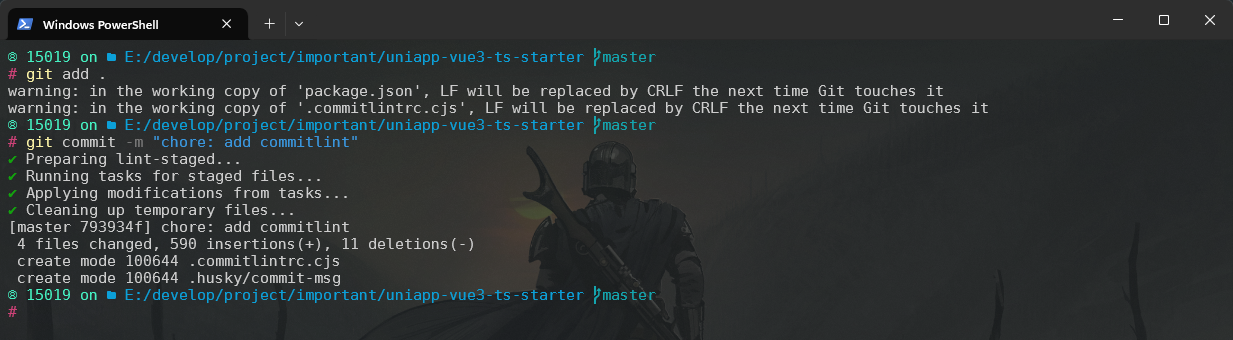
咱们接着使用一个符合规范的提交信息来看看效果,可以看到没有报错并且没有被中断,满足咱们的预期,这意味着 commitlint 已经配置成功!如下所示:
commitizen
Tip
官方文档地址:commitizen/cz-cli: The commitizen command line utility. #BlackLivesMatter (github.com)
参考文档地址:
commitizen 是一个 cli 工具,用于规范化 git commit 信息,可以代替 git commit。
使用
pnpm i -g commitizen命令全局安装 commitizen。引入 commitizen 可以帮助咱们便捷式地创建符合 commitlint 规范的 commit message。执行
commitizen init cz-conventional-changelog --pnpm --save-dev --save-exact命令,使其支持 Angular 的 Commit message 格式。其中 cz-conventional-changelog 是 commitizen 的 conventional-changelog 适配器,使用该适配器,commitizen 将以 AngularJS 的 commit message 规范逐步引导咱们完成 commit message 的创建。
以后,凡是用到 git commit 命令,一律改为使用 git cz。这时,就会出现选项,用来生成符合格式的 commit message。如下所示: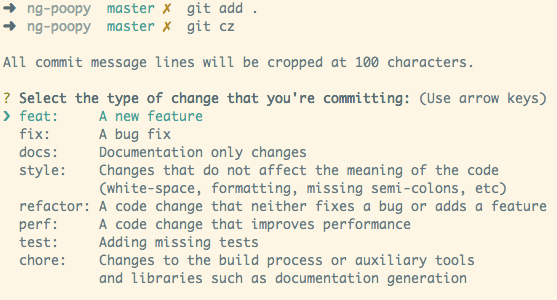
使用 git add . 命令将所有的变更文件添加到暂存区,然后再执行 git cz 命令提交代码,可以看到终端中有了对应的步骤和信息提示,非常好!一切都在咱们的预料当中,满足了咱们的诉求。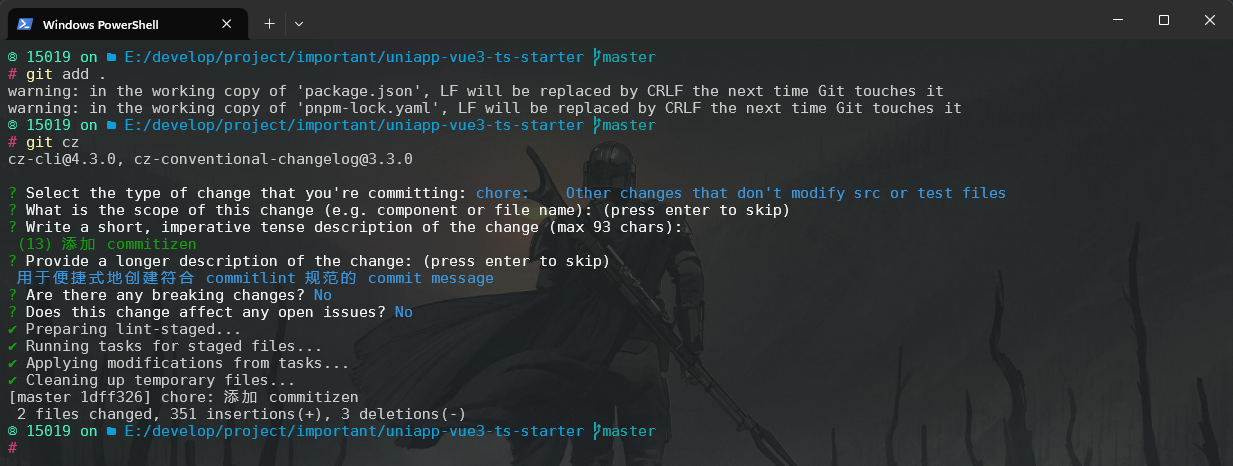
Stylelint
Stylelint 是一个强大、先进的 CSS 代码检查器(linter),可以帮助你规避 CSS 代码中的错误并保持一致的编码风格。
建议在使用 Stylelint 的同时使用格式化工具 Prettier。代码检查工具和格式化工具是互相补充的,能够辅助你编写一致且正确的代码。
使用
pnpm add -D stylelint stylelint-config-html stylelint-config-recess-order stylelint-config-recommended stylelint-config-recommended-scss stylelint-config-recommended-vue stylelint-prettier命令安装 Stylelint 相关依赖;在项目根目录下创建一个名为
.stylelintrc.cjs的配置文件,文件内容如下所示:jsmodule.exports = { root: true, extends: [ // stylelint-config-standard 替换成了更宽松的 stylelint-config-recommended 'stylelint-config-recommended', // stylelint-config-standard-scss 替换成了更宽松的 stylelint-config-recommended-scss 'stylelint-config-recommended-scss', 'stylelint-config-recommended-vue/scss', 'stylelint-config-html/vue', 'stylelint-config-recess-order', ], plugins: ['stylelint-prettier'], overrides: [ // 扫描 .vue/html 文件中的<style>标签内的样式 { files: ['**/*.{vue,html}'], customSyntax: 'postcss-html', }, { files: ['**/*.{css,scss}'], customSyntax: 'postcss-scss', }, ], // 自定义规则 rules: { 'prettier/prettier': true, // 允许 global 、export 、v-deep等伪类 'selector-pseudo-class-no-unknown': [ true, { ignorePseudoClasses: ['global', 'export', 'v-deep', 'deep'], }, ], 'unit-no-unknown': [ true, { ignoreUnits: ['rpx'], }, ], // 处理小程序page标签不认识的问题 'selector-type-no-unknown': [ true, { ignoreTypes: ['page'], }, ], 'comment-empty-line-before': 'never', // never|always|always-multi-line|never-multi-line 'custom-property-empty-line-before': 'never', 'no-empty-source': null, 'comment-no-empty': null, 'no-duplicate-selectors': null, 'scss/comment-no-empty': null, 'selector-class-pattern': null, 'font-family-no-missing-generic-family-keyword': null, }, }如果有一些文件需要排除,可以再创建一个
.stylelintignore文件在项目根目录下,里面添加要排除的文件或者文件夹名称即可。dist/ src/uni_modules/修改
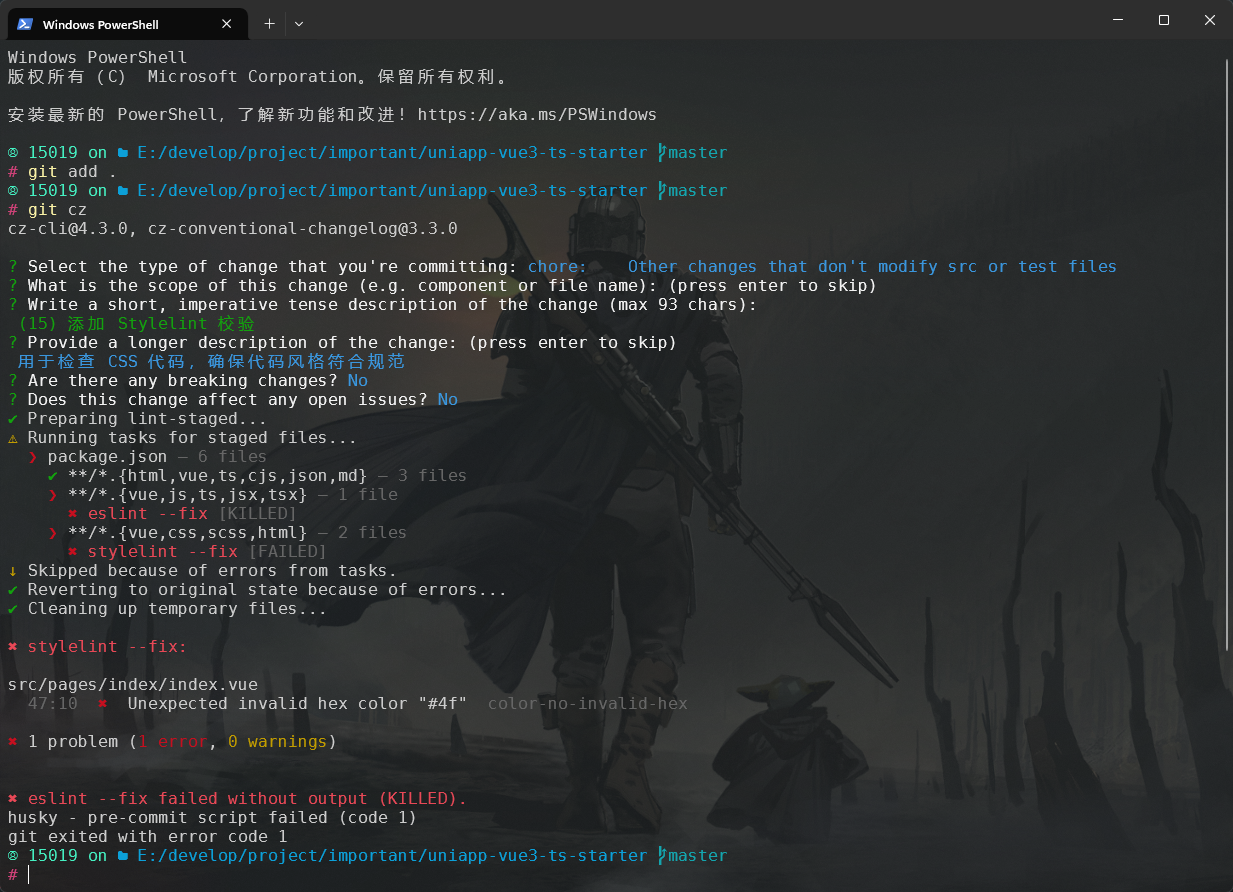
package.json文件,让 lint-staged 作用于 Stylelintjson{ // ... "lint-staged": { "**/*.{html,vue,ts,cjs,json,md}": [ "prettier --write" ], "**/*.{vue,js,ts,jsx,tsx}": [ "eslint --fix" ], "**/*.{vue,css,scss,html}": [ "stylelint --fix" ] }, // ... }故意书写不符合要求的 css 样式,可以看到在提交代码的过程中会输出详细的错误信息并且中断了代码提交,这非常好,符合咱们的预期!如下所示:
准备工作
TS 类型校验
打开 tsconfig.json 文件,发现报错,错误信息如下所示: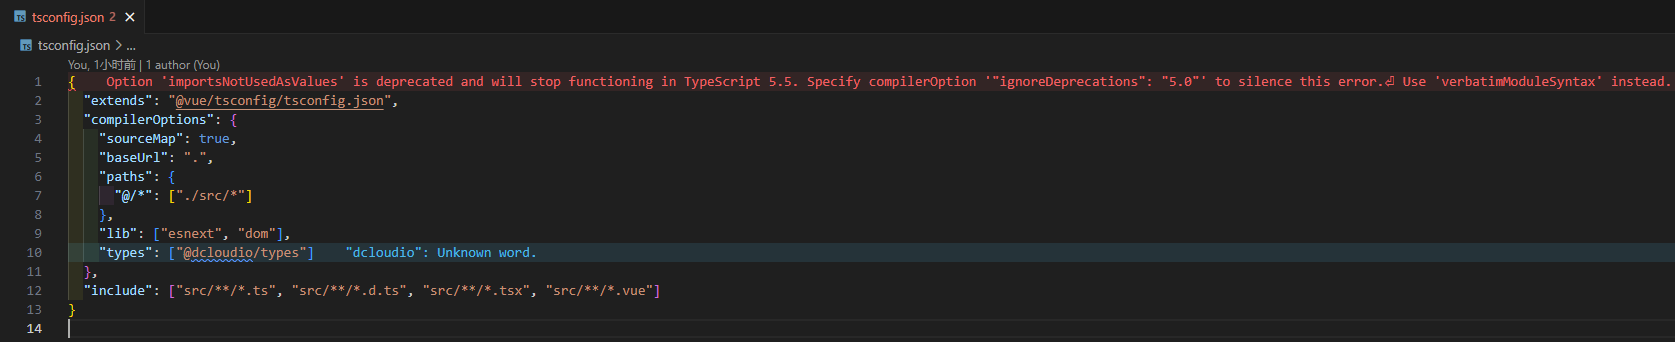
根据提示咱们需要在当前文件的 compilerOptions 选项中添加 "ignoreDeprecations": "5.0" 选项!
{
  "extends": "@vue/tsconfig/tsconfig.json",
  "compilerOptions": {
    "sourceMap": true,
    "baseUrl": ".",
    "paths": {
      "@/*": [
        "./src/*"
      ]
    },
    "lib": [
      "esnext",
      "dom"
    ],
    "types": [
      "@dcloudio/types"
    ],
    "ignoreDeprecations": "5.0"
  },
  "include": [
    "src/**/*.ts",
    "src/**/*.d.ts",
    "src/**/*.tsx",
    "src/**/*.vue"
  ]
}此时我们打开 pages/index/index.vue 文件,给 image 内置组件的 mode 属性赋值为 “xxx”,如下所示:
<template>
  <view class="content">
    <image class="logo" mode="xxx" src="/static/logo.png" />
    <view class="text-area">
      <text class="title">
        {{ title }}
      </text>
    </view>
  </view>
</template>在 image 内置组件的 mode 属性中很显然是没有 “xxx” 的属性值的,但是代码中并没有错误提示,所以为了符合 TS 类型校验,我们需要额外配置 TS类型校验:
安装类型声明文件:
pnpm add -D @types/node miniprogram-api-typings @uni-helper/uni-app-types;配置
tsconfig.json文件:json{ "extends": "@vue/tsconfig/tsconfig.json", "compilerOptions": { "sourceMap": true, "baseUrl": ".", "paths": { "@/*": [ "./src/*" ] }, "lib": [ "esnext", "dom" ], "types": [ "@dcloudio/types", "@uni-helper/uni-app-types", "miniprogram-api-typings" ], "ignoreDeprecations": "5.0" }, "include": [ "src/**/*.ts", "src/**/*.d.ts", "src/**/*.tsx", "src/**/*.vue" ] }当引入 uniapp 内置组件类型之后,发现文件报如下错误:
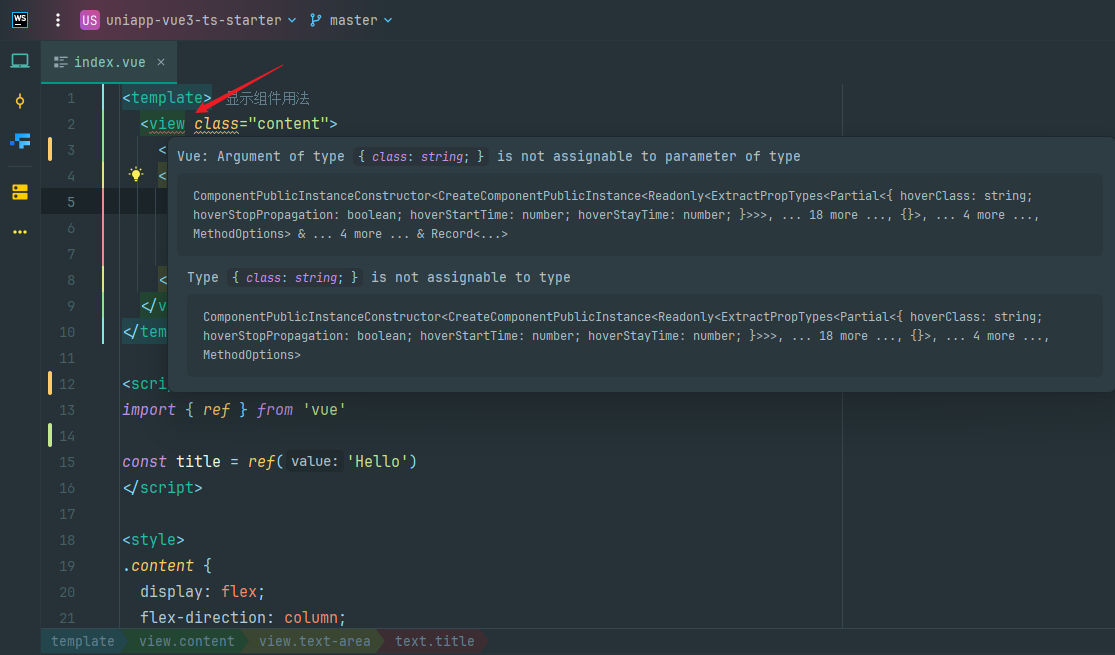
参考其他人提出的 issue webstorm 上会对模版上的 class 显示异常 · Issue #63 · uni-helper/uni-app-types (github.com),需要进行如下处理:
json{ "extends": "@vue/tsconfig/tsconfig.json", "compilerOptions": { "sourceMap": true, "baseUrl": ".", "paths": { "@/*": [ "./src/*" ] }, "lib": [ "esnext", "dom" ], "types": [ "@dcloudio/types", "@uni-helper/uni-app-types", "miniprogram-api-typings" ], "ignoreDeprecations": "5.0" }, "vueCompilerOptions": { "plugins": [ "@uni-helper/uni-app-types/volar-plugin" ] }, "include": [ "src/**/*.ts", "src/**/*.d.ts", "src/**/*.tsx", "src/**/*.vue" ] }
UI 组件库
以下两种 UI 组件库任选其一即可,推荐使用 wot-design-uni 组件库。
Wot Design Uni
wot-design-uni 组件库基于 vue3 + Typescript 构建,参照 wot design 的设计规范进行开发,提供 70+ 高质量组件,支持暗黑模式、国际化和自定义主题,旨在给开发者提供统一的UI交互,同时提高研发的开发效率。
安装:使用
pnpm add wot-design-uni命令安装 wot-design-uni 组件库;关于 SCSS:wot-design-uni 依赖 SCSS,你需要使用
pnpm i sass -D命令安装此插件,否则无法正常运行。如果已安装,请略过。配置 easycom 自动引入组件:传统vue组件,需要安装、引用、注册,三个步骤后才能使用组件。
easycom将其精简为一步。只要组件路径符合规范(具体见easycom),就可以不用引用、注册,直接在页面中使用。Tip
- uni-app 考虑到编译速度,直接在
pages.json内修改easycom不会触发重新编译,需要改动页面内容触发。 - 请确保您的 pages.json 中只有一个 easycom 字段,否则请自行合并多个引入规则。
json// pages.json { "easycom": { "autoscan": true, "custom": { "^wd-(.*)": "wot-design-uni/components/wd-$1/wd-$1.vue" } }, // 此为本身已有的内容 "pages": [ // ...... ] }- uni-app 考虑到编译速度,直接在
UI 组件类型提示:如果你使用
pnpm,请在根目录下创建一个.npmrc文件,参见issue。// .npmrc public-hoist-pattern[]=@vue* // or // shamefully-hoist = trueVolar 支持:如果您使用
Volar,请在tsconfig.json中通过compilerOptions.type指定全局组件类型。Tip
cli 项目使用
uni_modules安装无需配置,对Volar的支持自动生效,HbuildX项目不支持此配置,故此步骤仅在cli项目使用npm安装时需要配置。json// tsconfig.json { "compilerOptions": { "types": ["wot-design-uni/global"] } }使用:
Wot Design Uni安装、配置完成之后,支持组件自动引入,故可以直接在 SFC 中使用,无需在页面内 import,也不需要在components 内声明,即可在任意页面使用。值得注意的是,uni-app平台不支持全局挂载组件,所以Message、Toast等组件仍需在SFC 中显式使用,例如:html<wd-toast></wd-toast>Tip
使用 uni_modules 安装时
Wot Design Uni的组件天然支持easycom规范,无需额外配置就可以自动引入组件,而使用 npm 安装需要自行配置easycom或@uni-helper/vite-plugin-uni-components。
uview-plus
咱们使用的 UI 框架是 uview-plus, uview-plus 是全面兼容 nvue 的 uni-app 生态框架,全面的组件和便捷的工具会让你信手拈来,如鱼得水,基于 uView2.0 初步修改,后续会陆续修复 vue3 兼容性,以及组合式 API 改造等。
安装:使用
pnpm i uview-plus命令安装 uview-plus;Note
此安装方式必须要按照npm方式安装的配置中的说明配置了才可用,且项目名称不能有中文字符。
关于 SCSS:uview-plus 依赖 SCSS,你必须要安装此插件,否则无法正常运行。请通过以下命令安装对 sass(scss) 的支持,如果已安装,请略过。
js// 安装sass pnpm i sass -D // 安装sass-loader,注意需要版本10,否则可能会导致vue与sass的兼容问题而报错 pnpm i sass-loader@10 -D配置步骤:
引入 uview-plus 主 JS 库:在项目
src目录中的main.ts中,引入并使用 uview-plus 的 JS 库。tsimport { createSSRApp } from 'vue' import App from './App.vue' import uviewPlus from 'uview-plus' export function createApp() { const app = createSSRApp(App) app.use(uviewPlus) return { app, } }引入 uview-plus 的全局 SCSS 主题文件:在项目根目录的
uni.scss中引入此文件。scss@import 'uview-plus/theme.scss';引入 uview-plus 基础样式:
Note
在
App.vue中首行的位置引入,注意给 style 标签加入 lang="scss" 属性css<style lang="scss"> @import 'uview-plus/index.scss'; </style>配置 easycom 组件模式:此配置需要在项目
src目录的pages.json中进行。Tip
- uni-app 为了调试性能的原因,修改
easycom规则不会实时生效,配置完后,您需要重启 HX 或者重新编译项目才能正常使用uview-plus 的功能。 - 请确保您的
pages.json中只有一个easycom字段,否则请自行合并多个引入规则。
json{ "easycom": { "autoscan": true, // 注意一定要放在custom里,否则无效,https://ask.dcloud.net.cn/question/131175 "custom": { "^u--(.*)": "uview-plus/components/u-$1/u-$1.vue", "^up-(.*)": "uview-plus/components/u-$1/u-$1.vue", "^u-([^-].*)": "uview-plus/components/u-$1/u-$1.vue" } }, // 此为本身已有的内容 "pages": [ // ...... ] }- uni-app 为了调试性能的原因,修改
typescript 支持:在 tsconfig.json 中参考如下配置增加 "uview-plus/types"
json{ "extends": "@vue/tsconfig/tsconfig.json", "compilerOptions": { "sourceMap": true, "baseUrl": ".", "paths": { "@/*": [ "./src/*" ] }, "lib": [ "esnext", "dom" ], "types": [ "@dcloudio/types", "@uni-helper/uni-app-types", "miniprogram-api-typings", "uview-plus/types" ], "ignoreDeprecations": "5.0" }, "vueCompilerOptions": { "plugins": [ "@uni-helper/uni-app-types/volar-plugin" ] }, "include": [ "src/**/*.ts", "src/**/*.d.ts", "src/**/*.tsx", "src/**/*.vue" ], "exclude": [ "dist", "node_modules" ] }
自动导入 Api
unplugin/unplugin-auto-import: Auto import APIs on-demand for Vite, Webpack and Rollup (github.com) 插件可以实现如下功能:
- 自动导入 Vue 相关函数,如:ref, reactive, toRef 等
- 自动导入 Pinia 相关函数,如:createPinia,defineStore,storeToRefs 等
- 自动导入 @vueuse/core 相关函数,如:useStorage、useTitle 等
安装:使用
pnpm i -D unplugin-auto-import命令安装 unplugin-auto-import 插件;配置:
ts// vite.config.ts import { resolve } from 'path' import { defineConfig } from 'vite' import uni from '@dcloudio/vite-plugin-uni' import AutoImport from 'unplugin-auto-import/vite' const pathSrc = resolve(__dirname, 'src') // https://vitejs.dev/config/ export default defineConfig({ plugins: [ uni(), AutoImport({ // 自动导入 Vue 相关函数,如:ref, reactive, toRef 等 // 参考自: https://github.com/sxzz/element-plus-best-practices/blob/main/vite.config.ts imports: ['vue'], // 是否在 vue 模板中自动导入 vueTemplate: true, // 指定自动导入函数TS类型声明文件路径,为true时在项目根目录自动创建,为false时关闭自动生成 dts: resolve(pathSrc, 'types', 'auto-import.d.ts'), }), ], resolve: { alias: { '@': pathSrc, }, }, })使用
pnpm run dev:mp-weixin命令运行到微信开发者工具,可以发现在src/types目录下会新生成一个auto-import.d.ts类型声明文件。使用:删除
pages/index/index.vue文件中的import { ref } from 'vue'语句,程序照样正常工作。如下所示:vue<template> <view class="content"> <image class="logo" src="/static/logo.png" /> <view class="text-area"> <text class="title">{{ title }}</text> </view> </view> </template> <script lang="ts" setup> import { ref } from 'vue' const title = ref('Hello') </script> <style> .content { display: flex; flex-direction: column; align-items: center; justify-content: center; } .logo { height: 200rpx; width: 200rpx; margin-top: 200rpx; margin-left: auto; margin-right: auto; margin-bottom: 50rpx; } .text-area { display: flex; justify-content: center; } .title { font-size: 36rpx; color: #8f8f94; } </style>
uni-use & VueUse 集成
uni-use 是 uni-app (vue3) 组合式工具集,基本上属于 VueUse 在 Uniapp 中的实现。
VueUse 是基于 Vue 组合式 API 的实用工具集,如 useStorage 函数可以实现状态持久化存储(localStorage|SessionStorage);useFullscreen 函数可以非常方便地实现全屏模式,等等。
安装
pnpm i @uni-helper/uni-use @vueuse/core@9插件;为什么没有使用@vueuse/core最新的 v10 版本呢?因为运行到微信小程序的时候会报如下错误: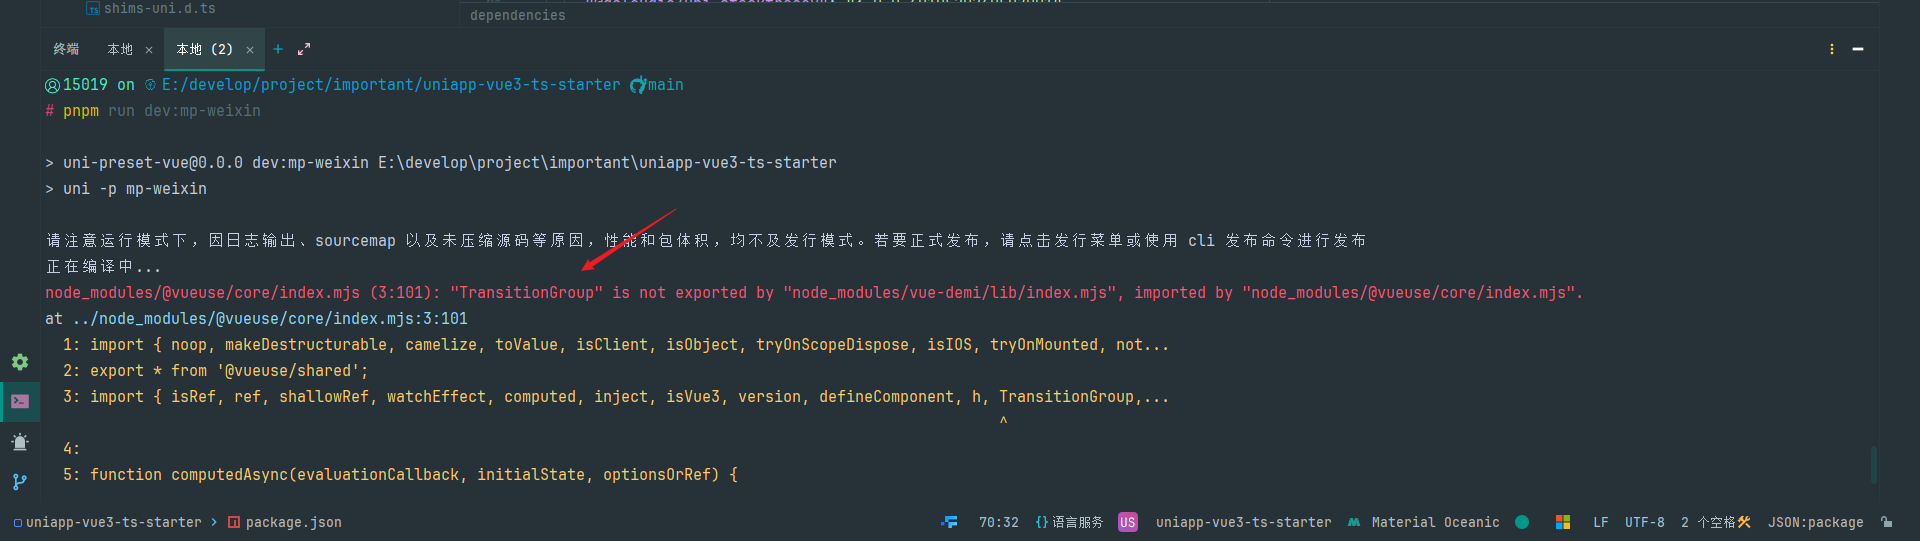
如果你希望使用
@vueuse/corev10,请参考 uni-app#4604。与
unplugin-auto-import结合使用:ts// vite.config.ts import { resolve } from 'path' import { defineConfig } from 'vite' import uni from '@dcloudio/vite-plugin-uni' import AutoImport from 'unplugin-auto-import/vite' import { uniuseAutoImports } from '@uni-helper/uni-use' const pathSrc = resolve(__dirname, 'src') // https://vitejs.dev/config/ export default defineConfig({ plugins: [ uni(), AutoImport({ // 自动导入 Vue 相关函数,如:ref, reactive, toRef 等 // 自动导入 @vueuse/core 相关函数,如:useStorage、useTitle 等 // 参考自: https://github.com/sxzz/element-plus-best-practices/blob/main/vite.config.ts imports: ['vue', '@vueuse/core', uniuseAutoImports()], // 是否在 vue 模板中自动导入 vueTemplate: true, // 指定自动导入函数TS类型声明文件路径,为true时在项目根目录自动创建,为false时关闭自动生成 dts: resolve(pathSrc, 'types', 'auto-import.d.ts'), }), ], resolve: { alias: { '@': pathSrc, }, }, })
环境变量与模式
在项目根目录下创建
.env和.env.development文件:# 变量必须以 VITE_ 为前缀才能暴露给外部读取 # 网站标题,应用名称 VITE_APP_TITLE = 'uniapp-vue3-ts-starter' # 微信小程序AppID VITE_WX_APPID = 'wx1fd9ae6397699e13' # 是否去除console VITE_DELETE_CONSOLE = true # 是否开启sourcemap VITE_SHOW_SOURCEMAP = false# 开发环境 NODE_ENV = 'development' # 是否去除console VITE_DELETE_CONSOLE = false # 是否开启sourcemap VITE_SHOW_SOURCEMAP = trueTypeScript 的智能提示:在
env.d.ts文件中按下面这样增加ImportMetaEnv的定义:ts/// <reference types="vite/client" /> declare module '*.vue' { import { DefineComponent } from 'vue' // eslint-disable-next-line @typescript-eslint/no-explicit-any, @typescript-eslint/ban-types const component: DefineComponent<{}, {}, any> export default component } interface ImportMetaEnv { /** 网站标题,应用名称 */ readonly VITE_APP_TITLE: string /** 微信小程序AppID */ readonly VITE_WX_APPID: string // 更多环境变量... }interface ImportMeta { readonly env: ImportMetaEnv } 使用:
ts// vite.config.ts import { defineConfig, loadEnv } from 'vite' import uni from '@dcloudio/vite-plugin-uni' import AutoImport from 'unplugin-auto-import/vite' import { uniuseAutoImports } from '@uni-helper/uni-use' import path from 'node:path' const pathSrc = path.resolve(__dirname, 'src') // https://vitejs.dev/config/ export default defineConfig(({ command, mode }) => { // mode: 区分生产环境还是开发环境 console.log('command, mode -> ', command, mode) // pnpm dev:h5 时得到 => serve development // pnpm build:h5 时得到 => build production // pnpm dev:mp-weixin 时得到 => build development (注意区别,command为build) // pnpm build:mp-weixin 时得到 => build production // pnpm dev:app 时得到 => build development (注意区别,command为build) // pnpm build:app 时得到 => build production // dev 和 build 命令可以分别使用 .env.development 和 .env.production 的环境变量 const { UNI_PLATFORM } = process.env console.log('UNI_PLATFORM -> ', UNI_PLATFORM) // 得到 mp-weixin, h5, app 等 const env = loadEnv(mode, path.resolve(process.cwd(), 'env')) const { VITE_SHOW_SOURCEMAP, VITE_DELETE_CONSOLE } = env console.log('环境变量 env -> ', env) return { // 自定义env目录 envDir: './env', // 自定义别名 resolve: { alias: { '@': pathSrc, }, }, plugins: [ uni(), AutoImport({ // 自动导入 Vue 相关函数,如:ref, reactive, toRef 等 // 自动导入 @vueuse/core 相关函数,如:useStorage、useTitle 等 // 参考自: https://github.com/sxzz/element-plus-best-practices/blob/main/vite.config.ts imports: ['vue', '@vueuse/core', uniuseAutoImports()], // 是否在 vue 模板中自动导入 vueTemplate: true, // 指定自动导入函数TS类型声明文件路径,为true时在项目根目录自动创建,为false时关闭自动生成 dts: path.resolve(pathSrc, 'types', 'auto-import.d.ts'), }), ], build: { // 方便非h5端调试 sourcemap: VITE_SHOW_SOURCEMAP === 'true', // 默认是false target: 'es6', // 开发环境不用压缩 minify: mode === 'development' ? false : 'terser', terserOptions: { compress: { drop_console: VITE_DELETE_CONSOLE === 'true', drop_debugger: true, }, }, }, } })
pinia 状态存储
Pinia 是 Vue 的专属状态管理库,它允许你跨组件或页面共享状态。
安装:使用
pnpm add pinia命令安装 Pinia;自动导入 Api:
ts// vite.config.ts export default defineConfig(({ command, mode }) => { // ... plugins: [ uni(), AutoImport({ // 自动导入 Vue 相关函数,如:ref, reactive, toRef 等 // 自动导入 @vueuse/core 相关函数,如:useStorage、useTitle 等 // 自动导入 Pinia 相关函数,如:createPinia,defineStore,storeToRefs 等 // 参考自: https://github.com/sxzz/element-plus-best-practices/blob/main/vite.config.ts imports: ['vue', '@vueuse/core', uniuseAutoImports(), 'pinia'], // 指定自动导入函数的查找目录 dirs: ['src/stores'], // 是否在 vue 模板中自动导入 vueTemplate: true, // 指定自动导入函数TS类型声明文件路径,为true时在项目根目录自动创建,为false时关闭自动生成 dts: path.resolve(pathSrc, 'types', 'auto-import.d.ts'), }), ], // ... } })使用:
- 在
src/stores目录下创建一个modules文件夹,以后不同模块功能的状态存储文件都放在该文件夹下。 - 在
src/stores目录下新建一个index.ts文件;- 创建 pinia 实例
- 定义并导出全局注册 pinia 实例的函数
- 集中统一导出各个模块
- 在
main.ts文件中全局注册 pinia
- 在
export const useCounterStore = defineStore('counter', () => {
  const count = useStorage('count', 0)

  return { count }
})import type { App } from 'vue'
const store = createPinia()
// 全局注册 store
export function setupStore(app: App<Element>) {
app.use(store)
}
export * from './modules/counter'
export { store }import { createSSRApp } from 'vue'
import App from './App.vue'
import { setupStore } from '@/stores'
export function createApp() {
const app = createSSRApp(App)
// 全局注册store状态管理
setupStore(app)
return {
app,
}
}<template>
<wd-swiper :current="0" :list="swiperList" autoplay></wd-swiper>
<wd-grid :column="3" border>
<wd-grid-item icon="picture" text="文字" />
<wd-grid-item icon="picture" text="文字" />
<wd-grid-item icon="picture" text="文字" />
<wd-grid-item icon="picture" text="文字" />
<wd-grid-item icon="picture" text="文字" />
<wd-grid-item icon="picture" text="文字" />
</wd-grid>
<wd-button @click="count++">+1</wd-button>
</template>
<script lang="ts" setup>
const swiperList = ref([
'https://unpkg.com/wot-design-uni-assets/redpanda.jpg',
'https://unpkg.com/wot-design-uni-assets/capybara.jpg',
'https://unpkg.com/wot-design-uni-assets/panda.jpg',
'https://img.yzcdn.cn/vant/cat.jpeg',
'https://unpkg.com/wot-design-uni-assets/meng.jpg',
])
const { count } = storeToRefs(useCounterStore())
</script>
<style lang="scss" scoped></style>